Quickstart Menu (choose a topic to visit a section of the guide)Help Home | Step 1: Create Account Step 2: Company Setup Step 3: Payroll Setup Step 4: Add Employees Step 5: Process Payroll |
Quick Start Guide Progress: 30%

Step 3: Setup Your Payroll Details
eNETEmployer requires a number of details about your payroll in order to operate. These range from basic items such as business name, address, contacts, business account, etc., to more detailed items such as your earning types, accumulators, benefits, deductions, WCB settings (where applicable) and more. Use the instructions below to learn how to set up your payroll details.
NOTE: Click on the images below to view them at full size
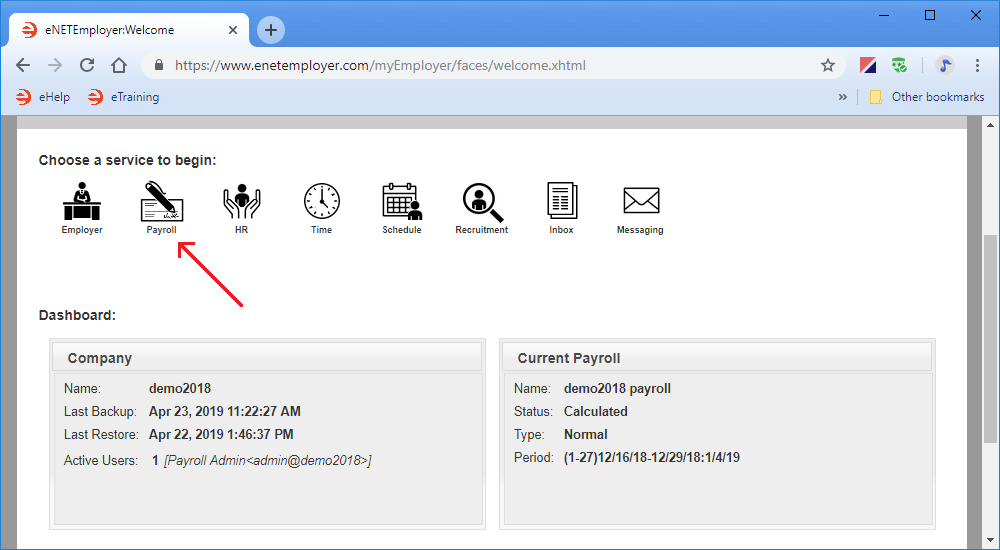
3A - Log In and Open the Payroll Service:
- Sign in to eNETEmployer and choose the Payroll service icon from the Welcome screen.
3B - Define Your Company's Name and Address Information:
eNETEmployer requires address information for your company for general correspondence purposes. Some of the information will already be populated by Canadian Payroll Systems when your company signed up for the service, and this information can be modified as needed by the subscribers during their use of the eNETEmployer service.
The following tutorial will show you how to enter address information for your company.
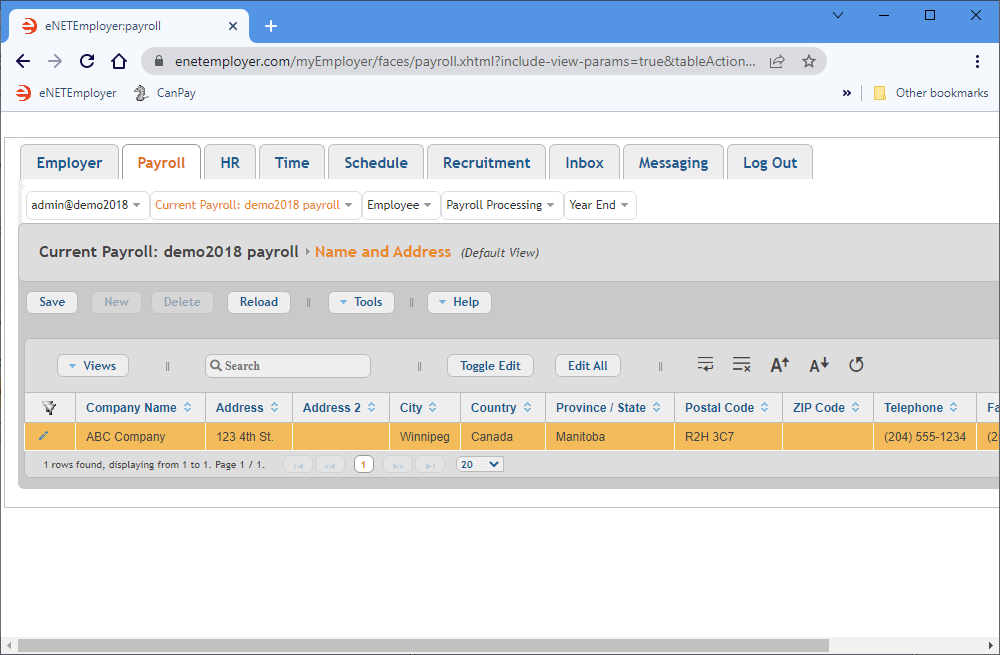
From the Payroll tab, open the Current Payroll - Name & Address screen where you can define the address settings for your company.
Show Me How...
Example: In Fig. 02 below, we have entered the address information for our sample company.
This completes the name and address information for your company. You are now ready to setup your payroll's contact information.
3C - Define Your Payroll's Contact Information:
eNETEmployer requires information for personnel in your organization who may be contacted for general correspondence of if we have any questions or concerns regarding your payroll.
The following tutorial will show you how to enter contact information for your company's payroll.
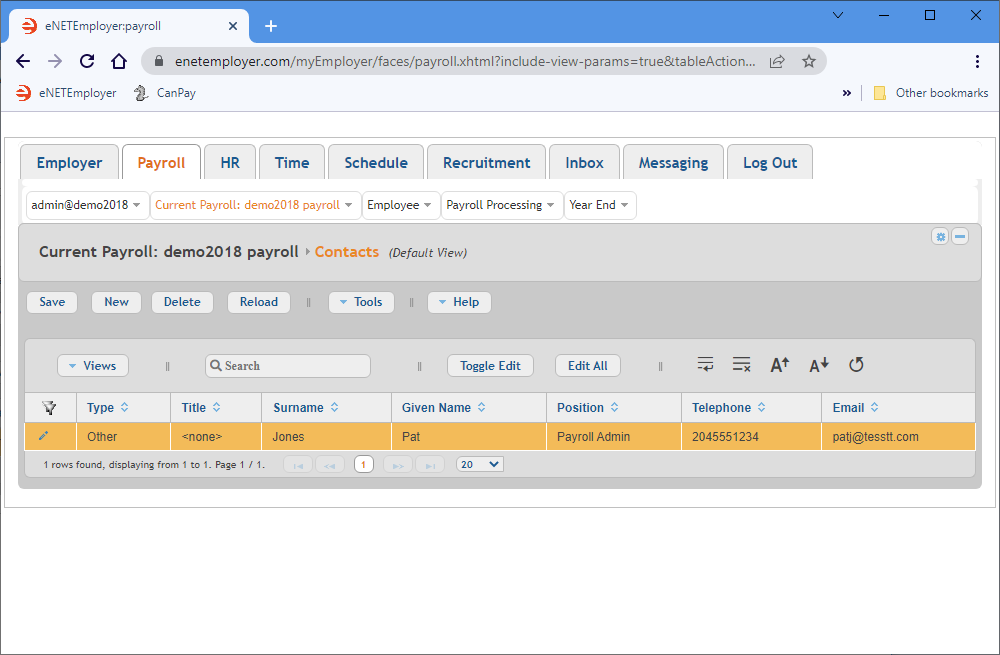
From the Payroll tab, open the Current Payroll - Contacts screen where you can define the address settings for your company.
Show Me How...
Example: In Fig. 03 below, we have entered the contact information for our sample company.
This completes the contact information for your company. You are now ready to setup your payroll's control information.
3D - Define Your Payroll's Control Information:
Each payroll requires you to set a number of parameters to control your payroll calculations. This includes the frequency at which the payroll and certain safety features to alert you if payroll amounts exceed certain thresholds.
The following tutorial will show you how to enter control information for your payroll.
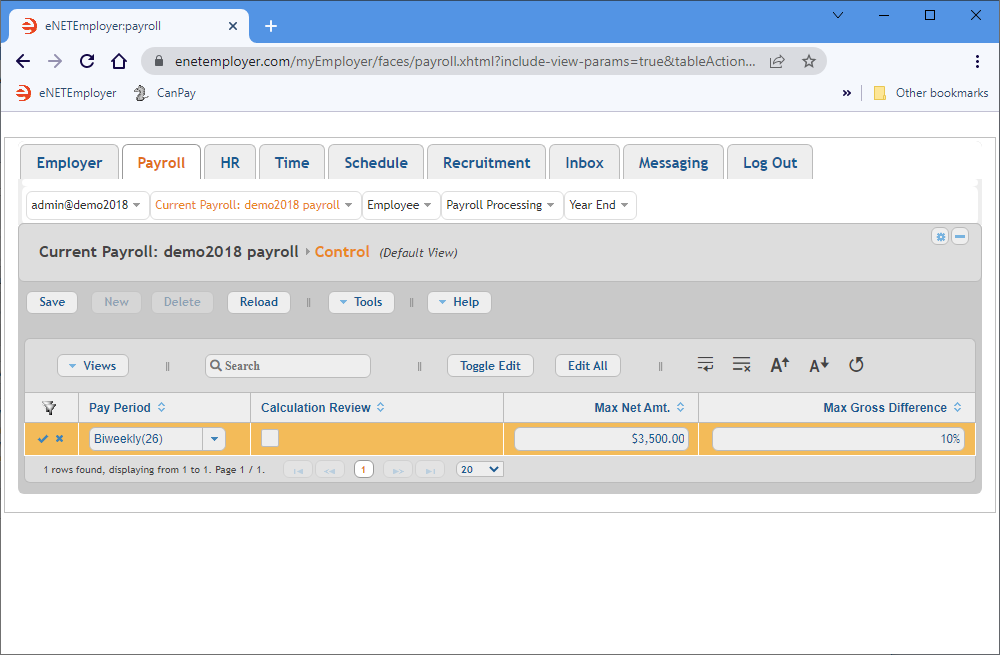
From the Payroll tab, open the Current Payroll - Control screen where you can define the address settings for your company.
Show Me How...
Example: In Fig. 04 below, we have entered the control information for our sample company.
This completes the control information for the payroll. You are now ready to setup your payroll's business accounts.
3E - Define Your Payroll's Business Account Information:
Each payroll requires a valid CRA Business Number (BN) in order to be processed. eNETEmployer allows you to enter more than one account number per payroll if needed (e.g. one for the Full rate and one for a Reduced rate).
The following tutorial will show you how to enter business account information for your payroll.
From the Payroll tab, open the Current Payroll - Business Accounts screen where you can define the address settings for your company.
Show Me How...
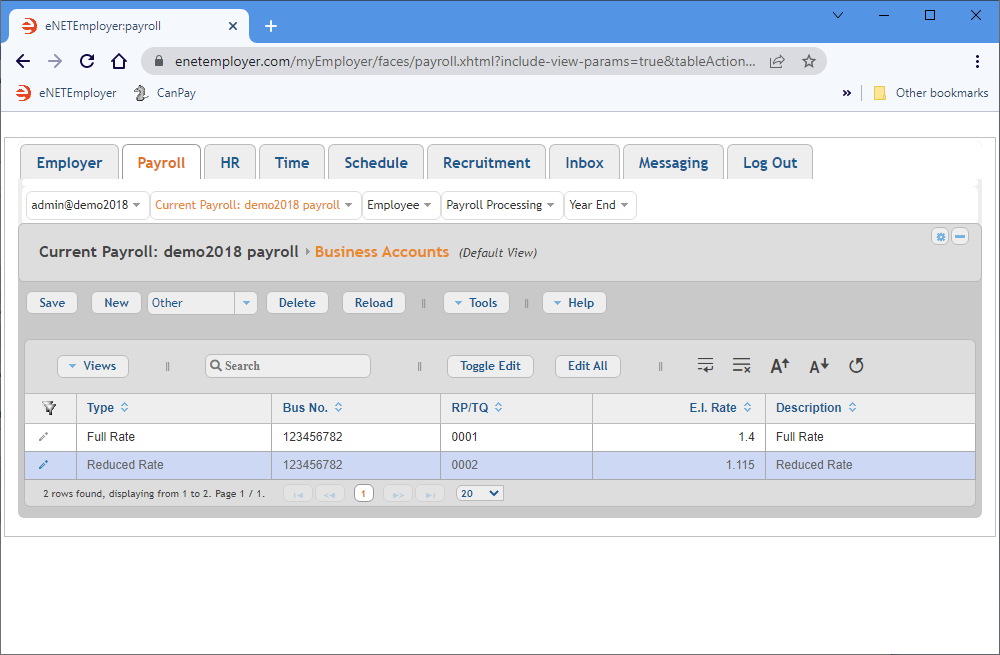
Example: In Fig. 05 below, we have created two accounts; one at the Full Rate of 1.4, and a second Reduced Rate account at 1.115.
This completes the business account for the payroll. You are now ready to setup your payroll's earnings.
3F - Define Your Payroll's Earning Information:
Each payroll requires you to define series of earning items - the records that control the wages for each employee. Earnings can be assigned to pay a fixed amount, a calculated amount (based on a formula), or even an amount that is based on a multiple of another earning.
The following tutorial will show you how to define your payroll's earnings.
From the Payroll tab, open the Current Payroll - Earnings screen where you can define the earnings that will be available in your payroll.
Show Me How...
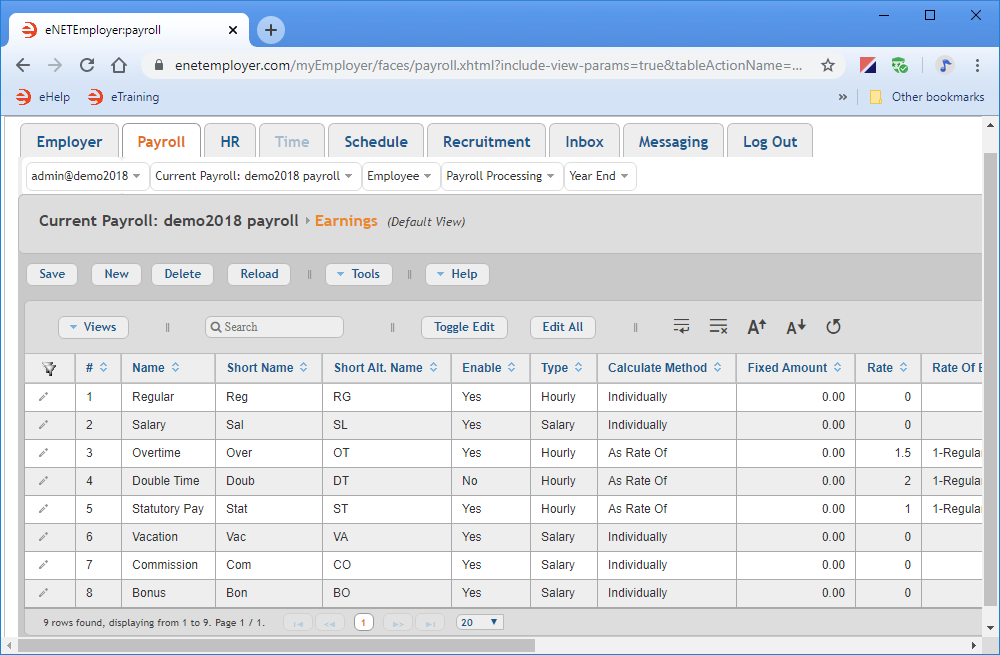
Example: In Fig. 06 below, we have entered 9 common earning types (Regular, Salary, Overtime, Double Time, Statutory Pay, Vacation, Commission, Bonus and Education).
This completes the earnings for the payroll. You are now ready to setup your payroll's functions.
3G - Define Functions for Your Payroll:
If you need to calculate a value that is based on one or more items or variables in your payroll, you can use a payroll function. Functions are mathematical formulas and methods that can be used for both simple and complex calculations.
The following tutorial will show you how to create 4 common payroll functions.
From the Payroll tab, open the Current Payroll - Functions screen. Functions are used to automate the calculation of various items in your payroll (e.g. deductions, benefits, accumulators, etc.)
Show Me How...
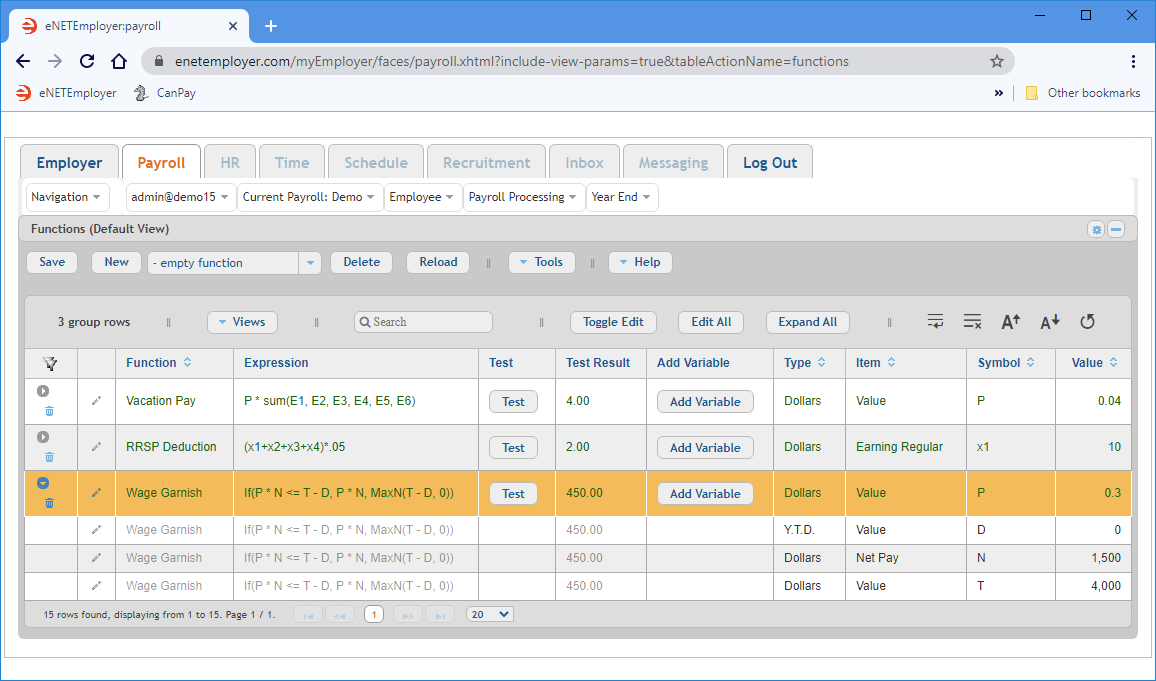
Example: In Fig. 07 below, we have entered 3 common functions (Vacation Pay, RRSP Deduction, and a Wage Garnishment). The garnishment function is shown below with its 3 sub-rows expanded.
This completes the functions for the payroll. You are now ready to setup your payroll's deductions.
3H - Define Deductions for Your Payroll:
eNETEmployer automatically calculates each employee's Income Tax, CPP, and E.I. deductions, based on their payroll settings. However, if you have further non-statutory deductions (dental plan premiums, life insurance premiums, pension contributions, union dues, garnishee orders etc.), you must create each deduction and apply it to all employees who are to have the funds deducted from their wages.
The following tutorial will show you how to create 3 common payroll deductions.
From the Payroll tab, open the Current Payroll - Deductions screen where you can define regular, non-statutory deductions such as dental plan premiums, life insurance premiums, pension contributions, union dues, garnishee orders etc.
Show Me How...
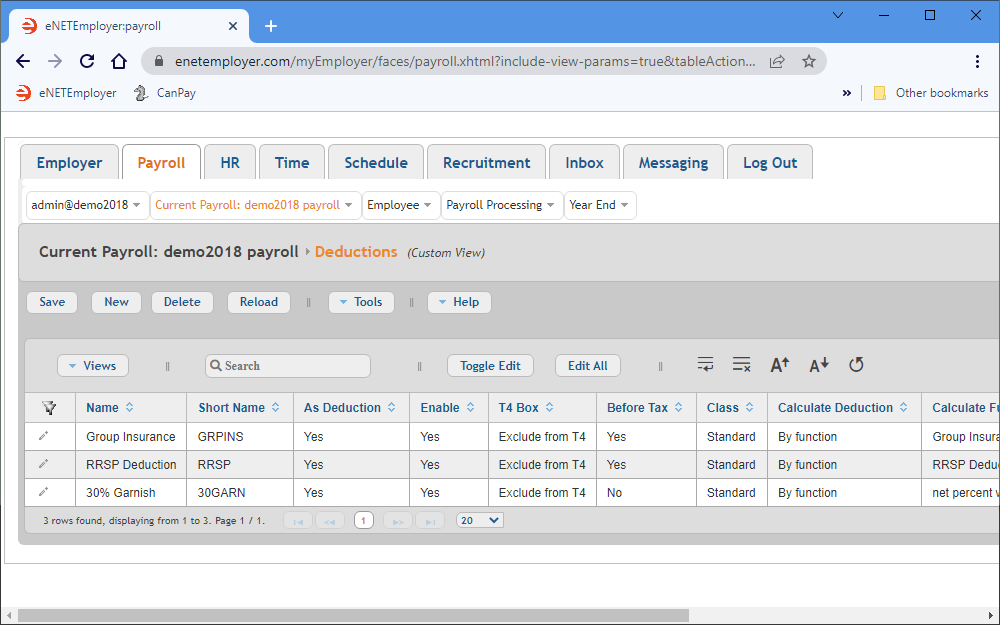
Example: In Fig. 08 below, we have entered 3 common deductions (Group Insurance, RRSP Deduction and Wage Garnishment).
This completes the deductions for the payroll. You are now ready to setup your payroll's benefits.
3I - Define Benefits for Your Payroll:
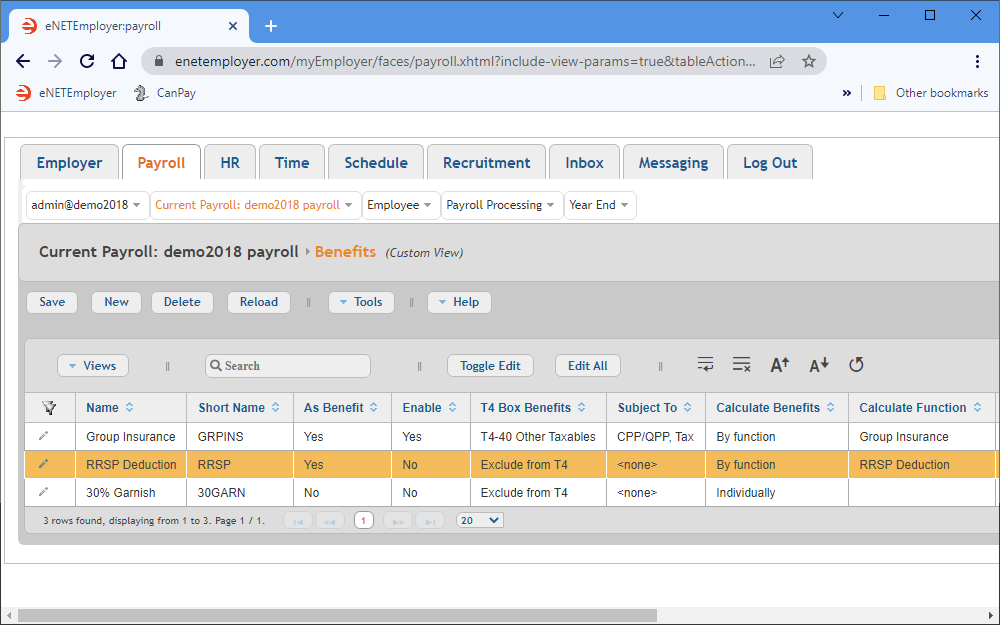
If payments are made by the company on the employee's behalf, they must be entered as a benefit item in the payroll. Benefits can be calculated as a factor of a deduction or as a percentage of an earning type. They can also be entered as a fixed amount on a per-pay-period basis.
The following tutorial will show you how to create 2 common payroll benefits.
From the Payroll tab, open the Current Payroll - Benefits screen where you can define regular, non-statutory deductions such as dental plan premiums, life insurance premiums, pension contributions, union dues, garnishee orders etc.
Show Me How...
Example: In Fig. 08 below, we have defined the appropriate settings for 2 common benefits (Group Insurance and the taxable benefit associated with the employer's portion of an RRSP Deduction).
This completes the benefits for the payroll. You are now ready to setup your payroll's accumulators.
3J - Define Accumulators for Your Payroll:
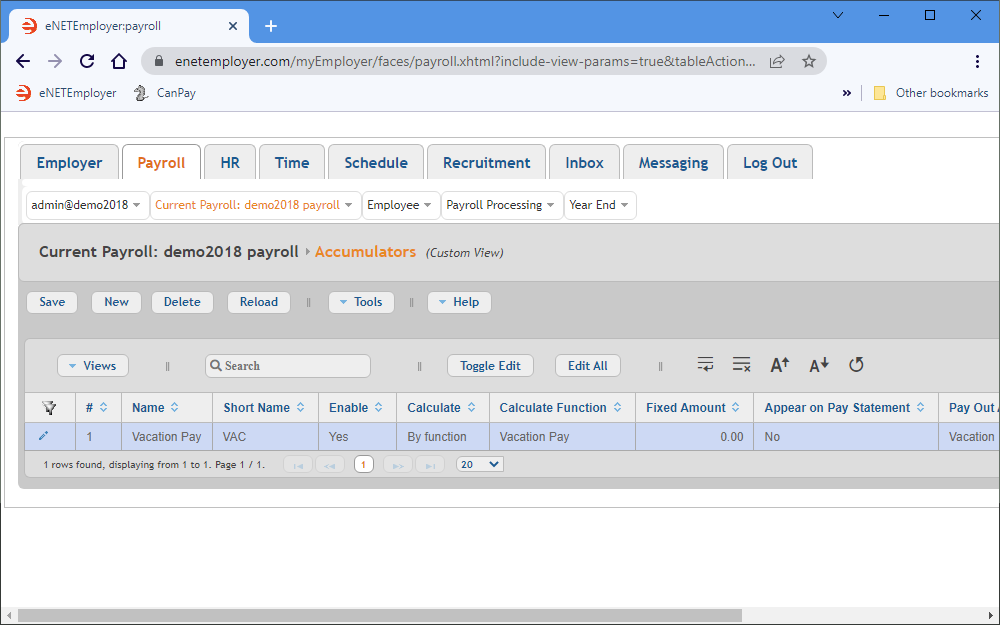
eNETEmployer allows you to create payroll accumulators - these are the items that are used to collect or build up amounts that will be used in various payroll calculations. The most common accumulator would be for accruing vacation pay over the year.
The following tutorial will show you how to create a common vacation accumulator.
From the Payroll tab, open the Current Payroll - Accumulators screen. where you can define your payroll accumulator items.
Show Me How...
Example: In Fig 10 below, we have defined one accumulator for accruing vacation time. This accumulator must be used in conjunction with an associated Vacation function (as discussed in the Creating Payroll Functions tutorial).
This completes the accumulators for the payroll. You are now ready to setup your payroll's WCB information (if applicable).
3K - Define Worker's Compensation (WCB) Settings for Your Payroll
The following step is optional - If your company is not subject to Workers' Compensation premiums, then you can skip this step.
eNETEmployer allows you to create payroll accumulators - these are the items that are used to collect or build up amounts that will be used in various payroll calculations. The most common accumulator would be for accruing vacation pay over the year.
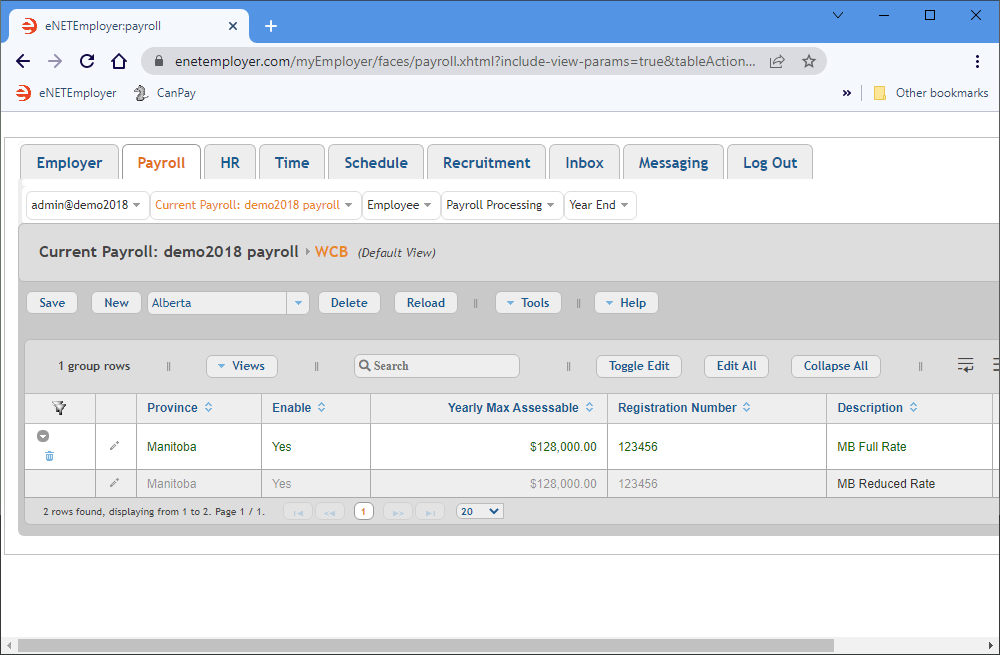
The following tutorial will show you how to create a WCB account for our sample province (Manitoba).
From the Payroll tab, open the Current Payroll - WCB screen. This screen is used to define the Worker's Compensation details for your province.
Show Me How...
Example: In Fig 11 below, we have defined a WCB account for Manitoba that has two defined rate classifications (1.50 and 0.68 respectively).
This completes the WCB information for the payroll. You are now ready to setup your payroll's provincial Health settings (if applicable).
3L - Define Provincial Health Settings for Your Payroll
The following step is optional - If your region does not support a payroll-funded provincial health plan, then you can skip this step.
eNETEmployer allows you to create a provincial health record that will help you to allocate the cost of Provincial Health to all the areas that your employees have worked. This step is useful for only those provinces that have a provincially-regulated health plan that is funded by payroll tax levies.
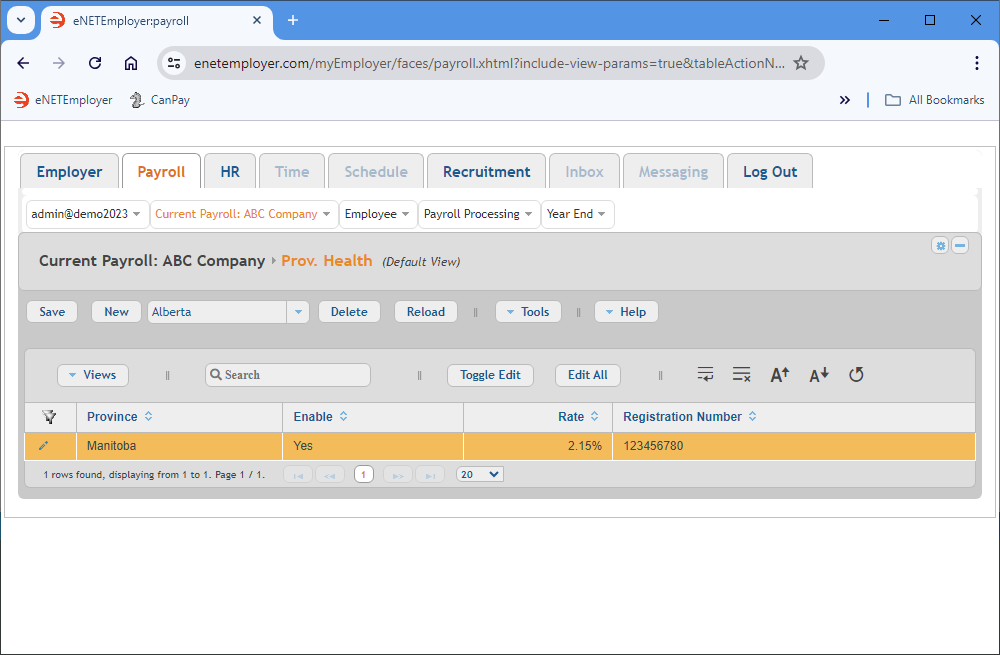
The following tutorial will show you how to enter provincial health information for our sample province (Manitoba).
From the Payroll tab, open the Current Payroll - Health screen. This screen is used to define your province's health rate so that eNETEmployer can allocate the cost of Provincial Health to all the areas that your employees have worked.
Show Me How...
Example: In Fig 12 below, we have defined a provincial health records for Manitoba. Its premium rate is set to 2.15% of the employees applicable earnings (as defined in the Earnings column).
This completes the provincial health settings for the payroll. You are now ready to setup your payroll's EFT settings, if necessary.
3M - Define EFT/Direct Deposit Settings
The following step is optional - If you do not pay your employees via Electronic Funds Transfer (EFT) / Direct Deposit, you can skip this step.
The Electronic Funds Transfer (EFT) feature (also referred to as Direct Deposit) allows you pay your employee's electronically by transferring funds directly to their bank account or financial institution. Before you can do so, you must create your company's bank profile so that it can be included in the EFT data file.
The following tutorial will show you how to create your company's EFT bank profile.
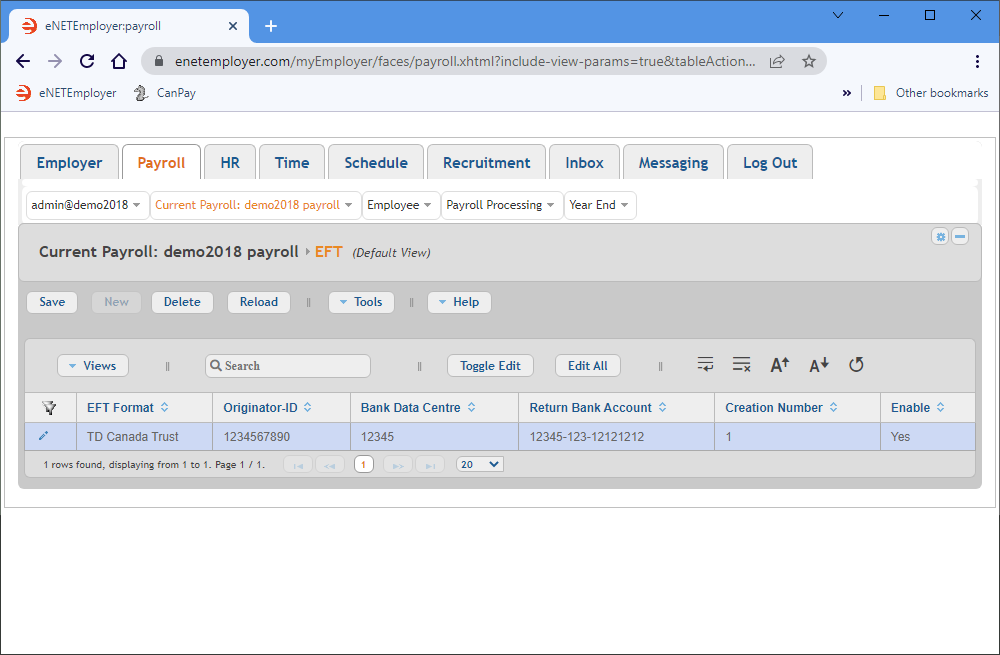
From the Payroll tab, open the Current Payroll - EFT screen where you must enter your company's banking information.
Show Me How...
Example: In Fig 13 below, we have defined an EFT record for our sample TD Canada Trust account. This bank account information will be included in the EFT file when it is generated.
This completes the EFT settings for the payroll. You are now ready to setup your payroll's Distribution settings.
3O - Define Distributions for Your Payroll:
All payrolls require a default "distribution" code so that eNETEmployer can create a valid Journal Entry report. Further, if you wish to split your employee's hours between several departments for export to your General Ledger (GL), then you must setup a series of Distribution codes that will translate allocated hours and amounts that correspond to a GL entry.
The following tutorial will show you how to define your company's distributions.
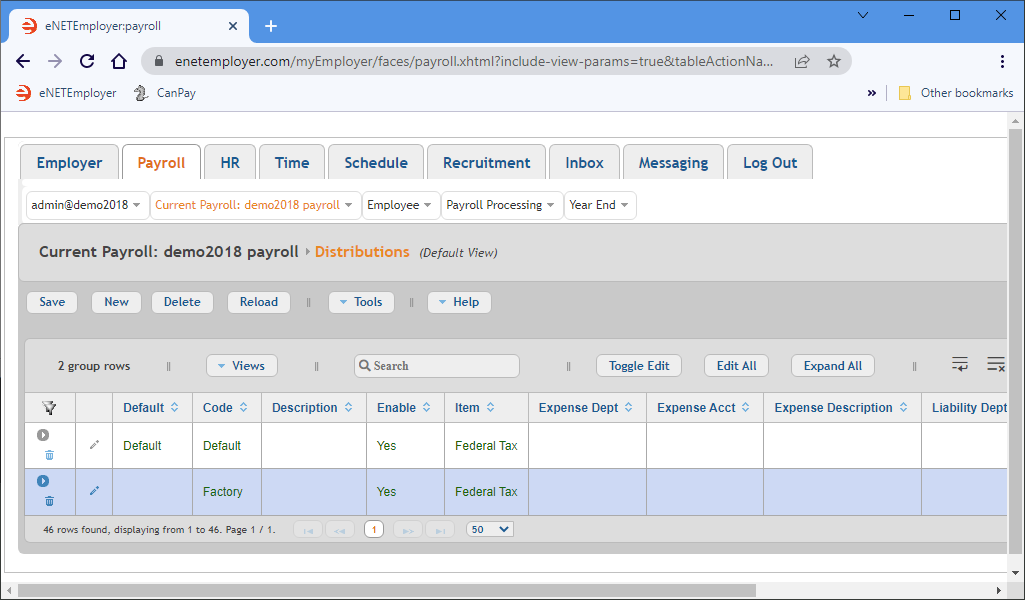
From the Payroll tab, open the Current Payroll - Distributions screen. This screen is used to define codes that are used by the program to translate allocated hours and amounts that corresponding to a General Ledger (GL) entry.
Show Me How...
Example: In Fig 15 below, we have created two distributions (Default and Factory).
This completes the distribution settings for the payroll. You are now ready to setup your payroll's template settings, if necessary.
3P - Define an Employee Template
This screen is optional - This step is not required to perform the payroll procedure. However, we suggest that you create a template in order to make the process of adding new employees much easier (since they contain pre-defined settings that can be applied in one step). If you have a small number of employees in your payroll and/or you are not concerned about using a manual approach when adding new employees, then you can skip this step.
If you have a large number of employees in your payroll, or if you add new employees frequently, you should create an employee template to assist you in the employee creation process.
The following tutorial will show you how to define your company's distributions.
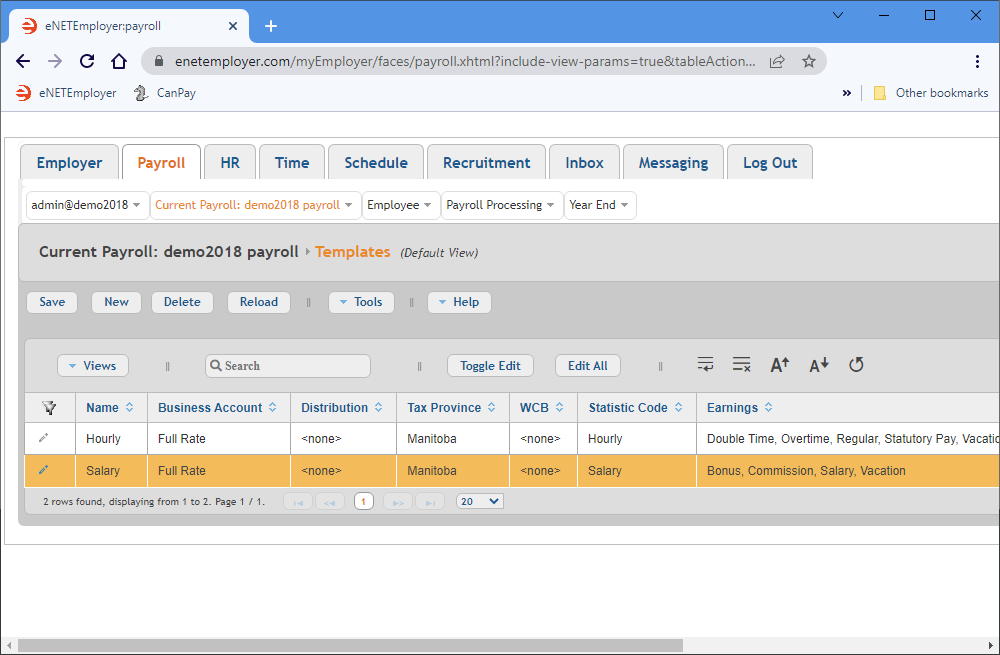
From the Payroll tab, open the Current Payroll - Templates screen. This screen is used to create and edit employee templates - the records that contain preset information about similar types of workers.
Show Me How...
Example: In Fig 16 below, we have created two templates (Hourly and Salary).
Step 3 is Complete!
This completes your basic payroll-related settings. To view detailed descriptions of this topic and many others, open the Online Help by pressing <F1> on any program screen, and then browse the various topics using the Help Index at the top. You can also view video tutorials of these functions by visiting our YouTube channel at www.youtube.com/canpay-payroll-services.
You are now ready to move to the next step:
Go to Step 4: Add Your Employees
Quick Start Guide Progress: 60%

