Help Toolbar (select a button to browse other online help sections) Home Tutorials Resources Search Tabs & Menus Button Bar Table & Data Display |
Functions (Payroll Tab)

This screen is optional - You can skip this screen if your payroll does not have any items that require a custom mathematical calculation formula and/or a related accumulator (e.g. sick time, banked time, vacation pay, wage garnish, pension, and RRSP).
This screen is used to define formulas and methods that can be used to automate the calculation of various items in your payroll. These formulas are known as Functions. Functions can be used for simple calculations (such as calculating wage garnishments to deduct a percentage of an employee's pay), or complex calculations involving multiple payroll items (such as a pension deduction where the deduction amount is the sum of specified earnings that are multiplied by a certain percentage). The most typical function is one that calculates employee vacation pay.
| View step-by-step tutorial |
Manual and Pre-Defined Functions - The program allows you to create functions manually (where you enter the function and supporting variables), or automatically where you choose your function from a list of pre-defined options.
|
Action Buttons (included on all screens)
The following action buttons appear on all screens just above the data table. Choose a button to view a detailed description of each command. Note: If a button appears in Gray, either the command is not applicable to the current screen, or its function has already been applied. You can also view the Button Descriptions help page to see the detailed descriptions of all program buttons on a single help page.
Save - Clicking this button saves all pending table changes to the program database. If a row is currently being edited, the changes will be saved and the row's checkmark (
) will remain so that you can continue making further edits.
New - This button allows you insert a new row (item) in the current table. Clicking the button adds the new row at the top of the table and activates Edit Mode so you can enter the data required for each cell. Note: If this button includes a drop-down list immediately to its right, you must first select an item from the list so that the new row will be based on the chosen list item.
Delete - Clicking this button removes the current row from the table. If you have multiple rows selected, all of the rows will be removed. When you click the button, you are prompted to make sure you want to delete the item(s) as the action cannot be undone.
Important Considerations - While most program screens allow you to delete a row easily, some screens contain items that require special consideration before deleting:
- Employees - When you delete an employee from the Payroll tab's Employee - Setup Employee screen, the employee will no longer be visible on any screen in the Payroll tab other than the Employee - Status Parameters screen (the latter screen is required so that the employee can undeleted if necessary). If you delete an employee from the Employee Database, the employee is irretrievable. Refer to the Deleting Employees tutorial for more information.
- Linked Items - Care should be taken when deleting an item(s) as they may be associated with other items in your database. If you attempt to delete an item and receive the following message: "Cannot delete <item> because it is linked to the following item:", it means that the item is associated (linked) with another item in the program. The item cannot be deleted until you remove the link/association between the two items. Refer to the Deleting Linked Items help page for more information.
- Sub Rows - Some screens contain sub-rows that will appear under the main row that you are deleting. If you see an Expand icon (
) at the leftmost side of the row, you may wish to expand the main row to ensure that you are deleting the proper items. Note: If you are presented with an error message stating that "the first item should be deleted last", it indicates that you must delete all of the sub rows first before you can delete the main row. For screens that offer a Trash icon (
) to the left of the main row, you can choose the icon to remove the row and all of it's sub-rows in one action.
Reload - Clicking this button refreshes the browser page and replaces the data in the current screen with the last saved copy from the database. This is useful if you have made a number of changes to a row and wish to discard them all in one operation. Note: Remember that eNETEmployer saves the changes to a row each time a new row is selected. Thus, if you edit three rows in succession and then select the Reload button, only the third row will be restored.
Tools - Clicking the button displays a drop-down menu with special data functions that are available for the current screen. Depending on the which screen you are viewing, the options may include any of all of the following:
- Audit - This option opens the History window that displays a list of changes that have been made to the current row. Changes are shown in colored text. Note: Audit History is a developing feature and subject to updates as new functionality is added.
- Backup - This option creates a backup file that contains your complete company database (from all program modules, including Payroll, HR, Recruitment, etc.) - including all of the necessary information required to restore your data to the last program state when the backup was created. Depending on your browser settings, the backup file will either be stored in your Downloads folder, or you may be presented with a window that will prompt you where to save the file. Click here to view a detailed description of the Backup command.
- Export - This option saves the current table's data to a semicolon-separated file that can be opened in a spreadsheet program. The export function is carried out immediately upon choosing the command. Depending on your browser settings, the file will either be stored in your Downloads folder, or you may be presented with a window that will prompt you where to save the file. Refer to the Export a File for Proper Formatting note above for more information on the Export feature.
- Import - This option allows you to import data from a character-separated (comma or semi-colon) spreadsheet file. Choosing the option opens a popup window where you can specify the file to be imported.
- Messages - This option displays the Messages Log window that contains a running log of program messages that appear above the table. This log will be active for the login session, and will be cleared when you log out or the program, or if the system times out. The popup window contains thee command buttons:
- Print - This button opens the Print window so that you can print a copy of the current table. A preview of the table will appear in a preview window before printing so that you can adjust the print settings as needed.
- Copy - This button copies the full contents of the Messages Log window to your computer's virtual clipboard. If you wish to copy only a portion of the text shown, select the desired text, and then press <Ctrl>+<C> on your keyboard.
- More - This button scrolls the window so that you can view messages that appear outside of the current view. You can also use the scroll bars at the left of the window to scroll through the window.
- Print - This option opens the Print window so that you can print a copy of the current table. A preview of the table will appear in a preview window before printing so that you can adjust the print settings as needed.
- Report - Available on the Payroll tab's Payroll Processing - Calculations screen only, this option generates an interim Payroll Register report so that you can review the details of the current pay sequence.
Help - Clicking this button displays a list of the various tutorials and online help tools that are provided for the current screen. The Online Help option provides a detailed description of each column and item on the current screen. The Step-by-Step option provides a tutorial for the current screen where you can follow along with the lesson one step at a time.
Table Control Buttons
The following table control buttons appear on all screens and are used to control the rows in each data table. Choose a button to view a detailed description of each command. You can also view the Button Descriptions help page to see the detailed descriptions of all table buttons on a single help page.
Views - This button allows you to work with the Customize View feature. Choosing the button displays a drop-down menu that contains any custom views that have been saved, and also provides the option to create new custom views. Refer to the Customize View help page to learn more about this feature.
Toggle Edit - Clicking this button switches from the current mode of editing (either On or Off), to the opposing mode. When the controls for a given row (cells, drop-down lists, checkboxes, etc.) are active and ready for editing, the row is considered to be in Edit Mode. For example, if you have row number one highlighted in the table, selecting the Toggle Edit button will display the editing icons for the row (
) so you can begin making changes. Toggling the edit mode once again will remove the edit icons and save any changes you have made. Refer to the Edit Mode help page to learn more about this feature. Note: If you activate the Edit Mode cell in the User - Options screen, the Toggle Edit button will not appear on the button bar.
Edit All - Clicking this button changes all visible rows to Edit Mode in order to facilitate easy data entry and editing. When the button is chosen, its label will change to read Accept All.
Accept All - Clicking this button deactivates Edit Mode for all visible rows and saves all of the changes that have been made to each row. When the button is chosen, its label will change back to read Edit All so that you can toggle in and out of Edit Mode easily.
Expand All - Clicking this button expands any rows that are collapsed. When the button is chosen, its label will change to read Collapse All so that you can toggle the row display and collapse all of the rows once again.
Collapse All - Clicking this button collapses any rows that have previously been expanded. When the button is chosen, its label will change to read Expand All so that you can toggle the row display to expand all of the rows once again.
Context-Specific Buttons (unique to this screen)
The following command buttons perform actions that are unique to this screen. Choose a button to view detailed description of each command. Note: If a button appears in Gray, either its function has already been applied, or the function is not applicable in the payroll's current state.
New - This button allows you to add a function to the current payroll. You can choose the - Empty Function - option (in the drop-down list immediately to the right of this button) to create a user-defined function, or you can choose from a list of pre-set functions. When you click the button, the chosen function appears in a new row at the top of the table, and Edit Mode is activated so that you can define the data required for each cell. Some of the preset functions include:
- EI Rebate Benefit
- EI Rebate Deduction
- Earn % with max
- Earn stat % with max
- Earnings percent
- Fixed amount with max
- Fixed amount with min net
- Net percent with max
The expressions for these pre-set functions are dynamic with their arguments being based upon the items in the current payroll. For example, if your payroll contains 4 types of earnings and you choose the Earnings Percent function above, the resulting expression will read: P * sum(E1, E2, E3, E4).
- The P variable represents the P Value (a.k.a. Placeholder Value) as entered in the Value cell.
- The E1 through E4 variables represent the values for the 4 earnings in your payroll.
- The * sum variable instructs the function to multiply the total value of the 4 earnings times the value of P.
Expressions (whether pre-defined or custom) can be modified at any time, but you must ensure that each variable has a supporting symbol or value assigned. For example, if you have previously added the Earnings Percent function (as mentioned above) and now wish to add a seventh earning, you would need to do two things:
- Select the Add Variable button to insert the new earning as a sub row in the function. Note: This action will also append an "xn" variable to your existing expression - the "n" is based on the number of existing sub rows).
- Modify the expression so that the appended variable is represented properly in order to support the new earning. In most cases, you will need to move the variable from the end of the expression to its proper location.
Table Columns
The following section of this help page describes the various columns and cells shown in the main table on this screen. If you see a description on this help page for a column that does not appear on your screen, you can add the additional column to your view by using the Customize option under the Views button (located at the left side of the screen just above the table). Refer to the Customize View help page for more help on this feature. Hidden Rows - The columns on the right side of the table contain sub-rows that may be hidden from view initially (to provide more screen space). If required, these additional rows can be revealed by selecting the Expand Row icon (the right-facing triangle |
Add Variable
Add Variable - Use this button to insert a new variable sub-row. Each of these sub-rows can be thought of as an argument that consists of an Item assignment, a Type designation and a Symbol. Each time you add a new variable, the following occurs:
- The default Type for the sub row is set to Dollar (as this is the most common type). The type can be changed as needed.
- A default symbol is created (in the Symbol cell) and a matching argument is appended to the sub row's expression (in the Expression cell). The symbol for new variable is based on the number that corresponds to the sub row that is being added. For example if you add a variable that appears as the fourth row, the resulting symbol will read x4. The default symbol can be changed as needed as long as it matches the corresponding expression.
Audit
This button allows you to view a list of changes that have been made to the current item. Choosing the button opens the Audit History window where item changes are shown in colored text. Note: Audit History is a developing feature and subject to updates as new functionality is added.
Expression
Use this cell to define the formula that will be used when this function is calculated. The expression should be defined according to standard mathematical rules. For example, a typical expression might be written as (A+B)*.10 - meaning that the amounts for A and B are added together, then the result is multiplied by .10. The variables that will support the expression can be assigned in the columns to the right of the Add Variable button.
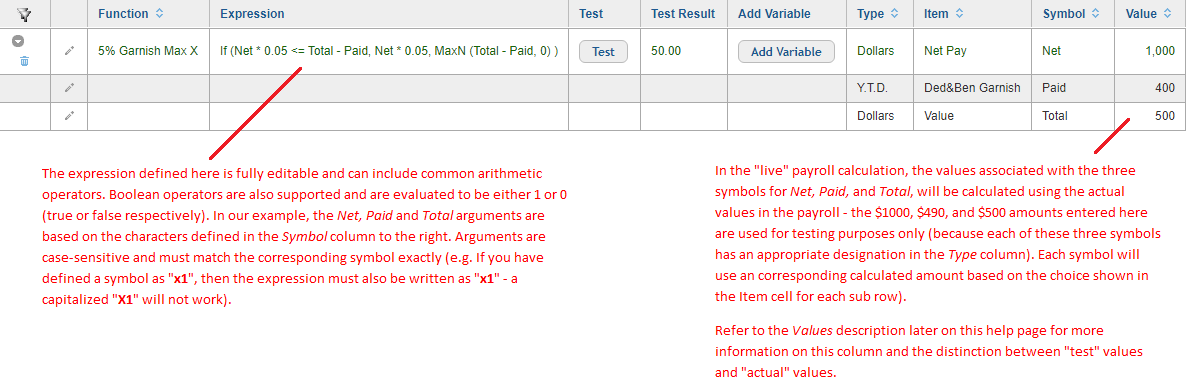
Complex Functions - You can create complex functions through the use of If statements and other operators, such as MinN, MaxN, Sum, Sqrt(). In the example below, we used a pre-defined function to create a garnish of 30% that caps out at $4000. If you prefer, you may use other methods and formulas to perform similar actions. For example, to define a garnishment of 5% (that caps out at a $500 maximum amount) from an employee's Net Pay, you could use the following expression: If (Net * 0.05 <= Total - Paid, Net * 0.05, MaxN (Total - Paid, 0) ). See the example below:
Function
Use this cell to enter the name of the function. The name shown here will appear in various screens and locations throughout the program.
Item
Use this cell to specify the item that the variable represents. For example, if you want the function to calculate the employee's regular wages, you would select the Earning Regular option from this list. Similarly, if you want to calculate based on one of the employee's statutory items, such as their employment insurance contributions, you would select the EI option from this list.
There are several types of items in this list - some are based on the employee's earnings and deductions, while others are based on the sum of multiple items. The categories include:
- Statutory Deductions - Federal Tax, CPP,EI, PPIP, QPIP, Que Tax
- Non-Statutory Deductions and Benefits - Any non-statutory deduction/benefit item defined in the current payroll (e.g. RRSP, Group Insurance, Garnishment).
- Earnings - Any earning defined in the current payroll (Salary, Bonus, Commission, Double Time, Overtime, Regular, Vacation, etc.)
- Net Pay - The employee's net pay amount.
- Value - Not a calculated amount, but a value based on the number entered in the Value cell.
Symbol
Use this cell to enter the name of the variable as it appears in the expression. Symbols are case-sensitive and can be entered as single characters or as a complete word or term. Single-character symbols will result in shorter, more concise expressions while word-based symbols will produce longer expressions (though the latter may be easier to understand). Note: Symbols in the top row of the group must begin with either a letter or an underscore character ( _ ). Sub-rows however, may include a number as the starting character.
Test
Test - Use this button to test the calculation result based on its associated items (Type, Item and Value). The variables in these columns are used to determine the resulting "test" calculation. Refer to the Value cell described on this help page for more information.
Test Result
This uneditable cell displays the calculated result of the current expression. This test value can be recalculated multiple times until the desired result is achieved (by adjusting the variables and then selecting the Test button again). Refer to the Value cell described on this help page for more information on this feature.
This cell will read Invalid Expression if the variables entered do not result in a valid calculation. In this case, you must review the variables and adjust them as required to achieve a valid result.
Type
Use this cell to specify how the selections in the Item column will be treated when they are calculated.
- Dollars - Choose this option to calculate the chosen item based on its dollar value.
- Hours - Choose this option to calculate the chosen item based on the amount of hours worked. This option applies only to items that can have their hours entered manually in the program (e.g. Regular, Double-time, Overtime, Vacation, etc.).
- Rate - This option is currently undefined.
- Y.T.D. - Choose this option to calculate the chosen item based on its Year-to-Date dollar value.
- EI Rate - Choose this option to calculate the chosen item based on the employee's Employment Insurance rate.
- EI Premium Rate - Choose this option to calculate the chosen item based on the employee's Employment Insurance premium rate.
- P Value - Choose this option to use a custom Placeholder Value (referred to as a "P Value") as part of the function. This allows you to override a single variable value by defining it as a P Value, instead of having to override the whole function expression.
 View a tutorial on Working with P Values
View a tutorial on Creating Payroll Functions
Value
Use this cell to define the value that will used for the corresponding variable in the row. This value is typically numerical (e.g. to represent a percentage or a fixed dollar value), but it can be text-based (e.g. an arbitrary symbol or series of characters to represent a variable). If the latter method is used, you must also associate the symbol with a corresponding choice in the Item cell.
Test Values - Depending on the variable's type, the value entered in this cell can either be used in the "live" payroll calculation or as a test value only (the latter, when you are using the Test button to verify the effects of your formula).
- Test Value Only - If a sub row has an item defined in the Item cell, any amount entered in the Value cell will be used for testing purposes only.
- Actual Value for Calculation Purposes - If a sub row does not have an item defined in the Item cell, any amount entered in the Value cell will be used in the actual payroll calculation.
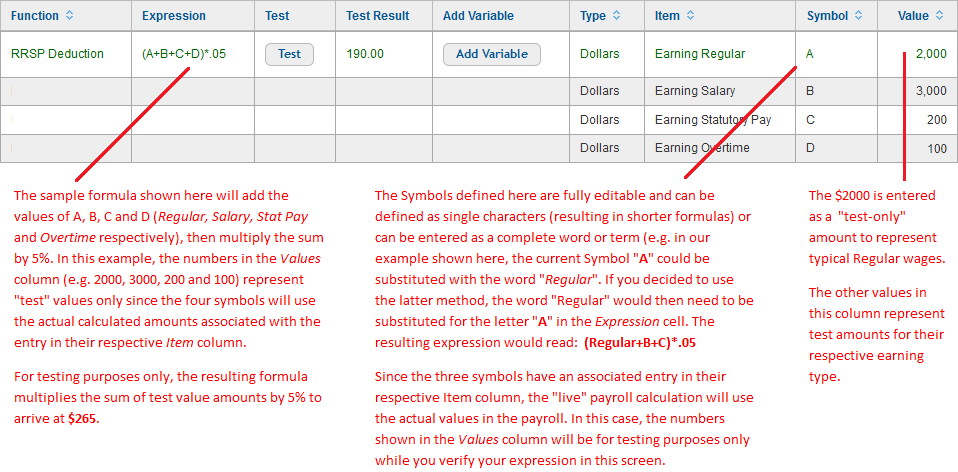
For example, if you have an RRSP Deduction formula that is to deduct 5% from the employee's pay each period, the formula could read (A+B+C+D)*05. See the example below:
Note: The value in the Test Result column is provided as a reference only in order to show a test outcome of the expression - it will not be used for any actual payroll calculations.
See Also