Help Toolbar (select a button to browse other online help sections) Home Tutorials Resources Search Tabs & Menus Button Bar Table & Data Display |
Assigning Accumulators using an Employee Template
This tutorial will discuss how to speed up the employee creation process by using an employee template to assign accumulators to new employees. Accumulators are the payroll items that are used to accrue/collect amounts that will be used in various payroll calculations.
Looking to assign employee accumulators manually? If you wish to assign employee accumulators manually, refer to the Assigning Employee Accumulators Manually tutorial. |
- The first part of the tutorial will show you how to assign the accumulators automatically. It will then discuss the relationship between accumulator items and employee templates and how they are linked together during the employee creation process.
- After the accumulators have been assigned via the template process, the second part of this tutorial will show you how to edit the specific settings to control each employee's accumulator.
Before you begin: This tutorial assumes that you have already created one or more employee templates (via the Templates screen). If you need to do so, refer to the Creating Employee Templates tutorial before proceeding with this lesson. You will also need to have already created one or more accumulators (via the Current Payroll - Accumulators screen). You may also wish to review the Payroll Accumulators help topic to familiarize yourself with these items. |
NOTE: Click on the images below to view them at full size
To add accumulators to your employee template:
- From the Payroll tab, open the Current Payroll - Templates screen.
- lf your desired template is not already in place, choose the New button to insert a new template row and then move through the cells and specify the various settings that will be assigned to any new employees who will be based on this template type (e.g. Hourly or Salary).
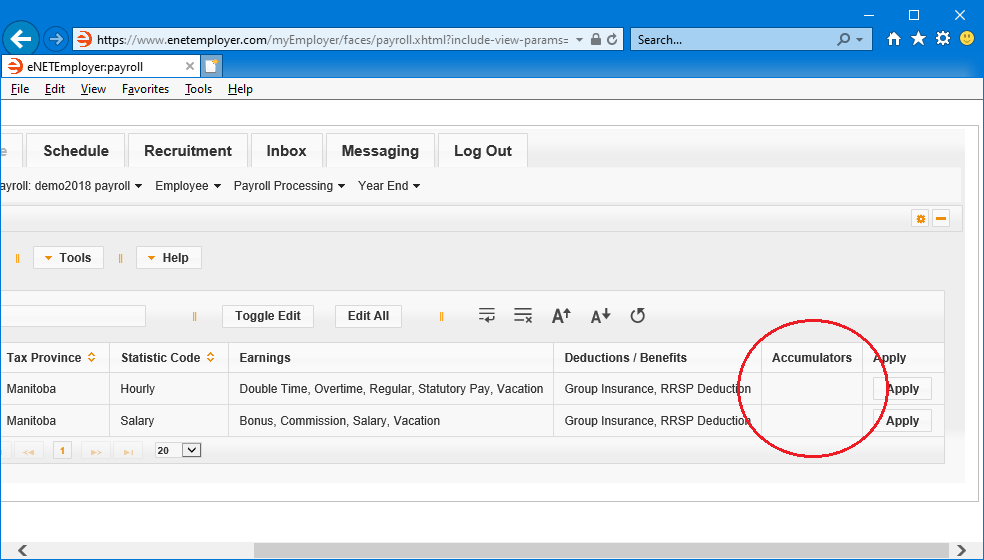
Example: In Fig. 01 below, we have two employee templates; one Hourly and one Salary. We can see that the first 6 columns have settings assigned, but we are still missing the accumulators that will be associated with both templates. - Edit the Hourly template row by double-clicking on it (or by choosing the Edit icon (the Pencil icon at the left side of the row).
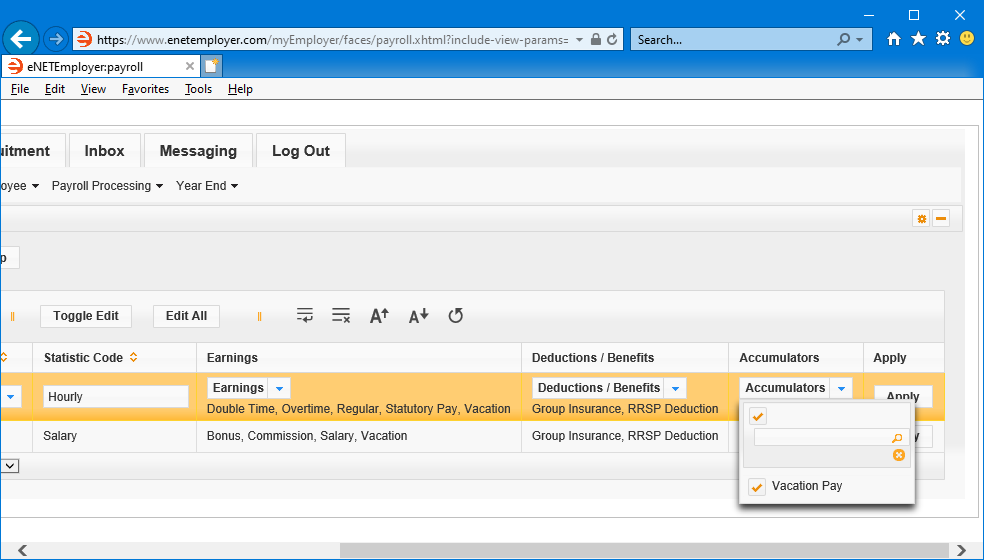
- Choose the drop-down list in the Accumulators cell, and then place a check in each box for the accumulator types that will be applied to hourly employees. Choose hourly-based items only, and leave the checkboxes blank for salary-based items. If all of the accumulators in the list will apply, you can choose the check box at the top of the drop-down list to select the entire list of items. The accumulators that appear in this drop-down list can be viewed or edited in the Current Payroll - Accumulators screen.
- Save each row's information when you are complete.
Example: In Fig. 02 below, we have added a Vacation accumulator to the hourly template. Each time we wish to add an hourly-based employee to our payroll, they will have this item assigned to them.
- Repeat the preceding 3 steps, substituting your Salary template and its appropriate accumulator types.
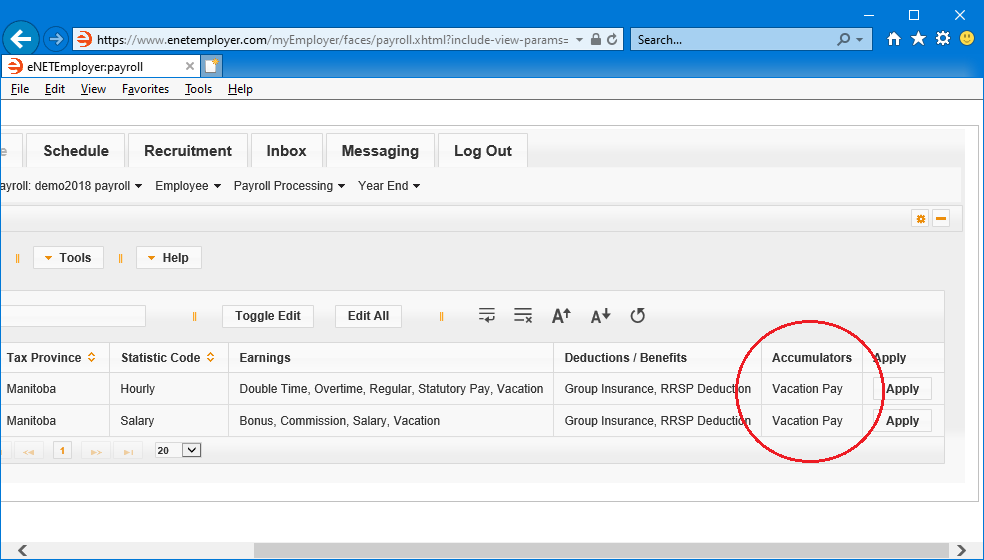
Example: In Fig. 03 below, we have assigned the appropriate accumulator types to our two employee templates.
We will now move to the next section of this tutorial and learn now to review and modify the individual accumulator settings for each employee.
To review or edit accumulator items that were added via the template:
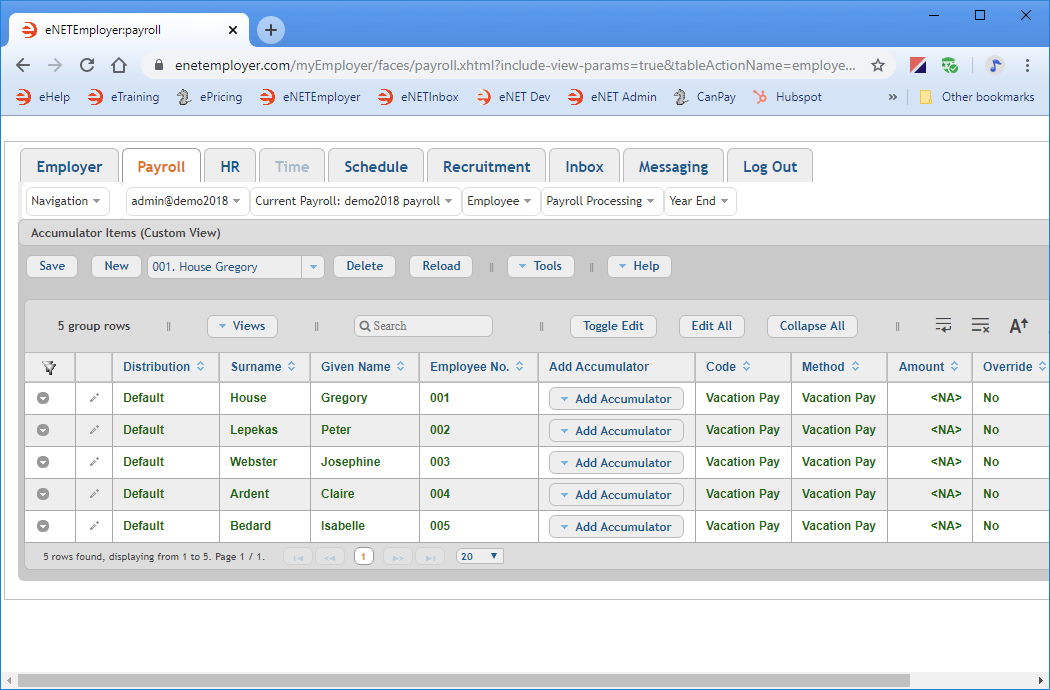
- From the Payroll tab, open the Employee - Accumulator Items screen. This screen allows you to assign "accumulators" to the various employees in the payroll. You can use the various options in this screen to add and define accumulator settings for new employees or to review or change settings for existing employees.
- Fixed Amount - Accumulators that are based on a Fixed Amount will display the set amount in the Calculation cell. The amount is uneditable in this screen and must be changed in the Current Payroll - Accumulators screen.
- Individually - Accumulators that are to be calculated Individually will have the Amount cell active so that a custom amount can be defined for each employee.
- The top row for each employee is referred to as the Primary row and is displayed in Green text and each sub row appears in Black text. Note: If you cannot see the sub rows for each employee, choose the Expand icon (the right-facing triangle at the beginning of the row) - this will reveal the employee's sub rows.
- If you are working through the tutorials, use the sample data in the table below to review the accumulator information for each employee.
- Though each employee is assigned the same accumulator (Vacation Pay), the amounts that are accrued for each will vary, based on their individual wages.
Accumulator Items Help Screen...
Note: As mentioned earlier, if you are working through the sample tutorials (or Step 4B of the Quick Start Guide), then the five employees that you created earlier will appear in the table along with one Vacation Pay accumulator item already assigned. This particular accumulator is based on a function that was created earlier and not require any further manual settings. In addition to Function-based calculations, accumulators may also be calculated as follows:
| Employee | Code | Method | Action |
|---|---|---|---|
| Gregory House | Vacation Pay | Vacation Pay | Accumulate |
| Peter Lepekas | Vacation Pay | Vacation Pay | Accumulate |
| Josephine Webster | Vacation Pay | Vacation Pay | Accumulate |
| Claire Ardent | Vacation Pay | Vacation Pay | Accumulate |
| Isabelle Bedard | Vacation Pay | Vacation Pay | Accumulate |

This completes the tutorial on adding accumulators via an employee template.
Note: If you are working through the payroll setup process in order, you will need to continue through the Employee menu to finish entering the data that is required for each new payroll employee.
See Also


