Help Toolbar (select a button to browse other online help sections) Home Tutorials Resources Search Tabs & Menus Button Bar Table & Data Display |
Reporting - Creating ROEs
ROE Overview - If you wish to learn more about ROEs, refer to the ROE Overview before proceeding with this tutorial.
eNETEmployer allows you to create both electronic and paper-based versions of an employee's Record Of Employment (ROE). For this tutorial, we will discuss how prepare the employee's status for the ROE, create a printed copy for review, and how to generate the electronic version that can be submitted to Service Canada.
In the following tutorial, we will manually terminate an employee so that the ROE can be created. There are 3 parts to this tutorial:
- Part 1 - Terminating an Employee
- Part 2 - Creating a Printed ROE (for preview purposes only)
- Part 3 - Creating an ROEWeb File
Before you begin: ROEs can only be issued for employees who are Terminated or On Leave from the payroll. In eNETEmployer, "Terminated" means that an employee's payroll status is set to Terminated, and a Termination date is assigned (the date being the last day for which the employee was paid - typically the last day that they worked). Before proceeding with this tutorial you must ensure that the employee has been terminated using one of the following methods:
|
NOTE: Click on an image below to view it at full size.
To Terminate an Employee Manually:
Before you create an ROE, you must terminate the employee using the options found in the Status Parameters screen. For example, if an employee is leaving the company, you would set their payroll status accordingly (Terminated, On Leave, or Last Pay). In the following tutorial, we will manually terminate an employee that the ROE can be created.
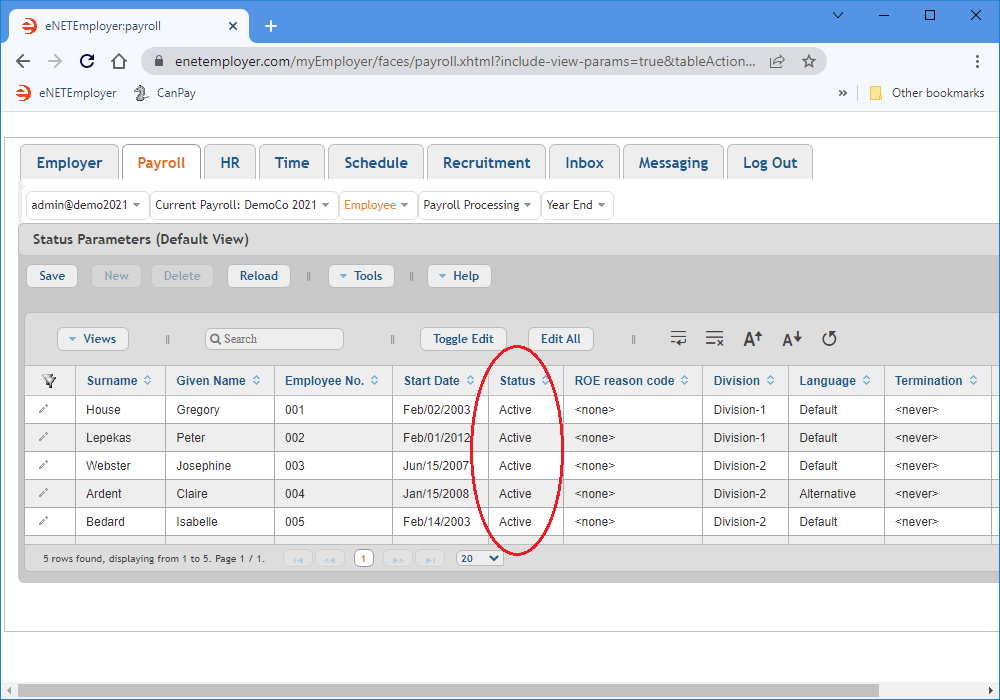
- From the Payroll tab, open the Employee - Status Parameters screen where you can review or edit their status or "standing" in the payroll. All of the employees who are actively engaged in work with the company will have the Active status assigned (see below).
- Double-click on the desired employee row to activate Edit Mode - you can also choose the Edit icon (the pencil) at the left side of the row. In our example, we will edit the row for Gregory House.
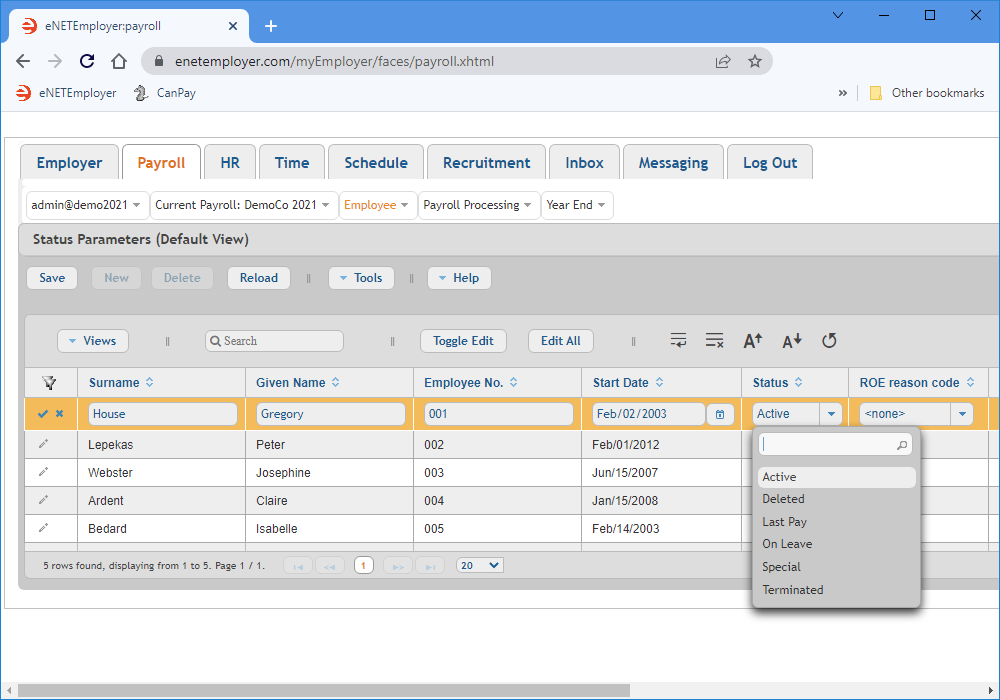
- Move to the Status cell and select the downward facing arrow. This displays a menu with all of the available statuses in the payroll.
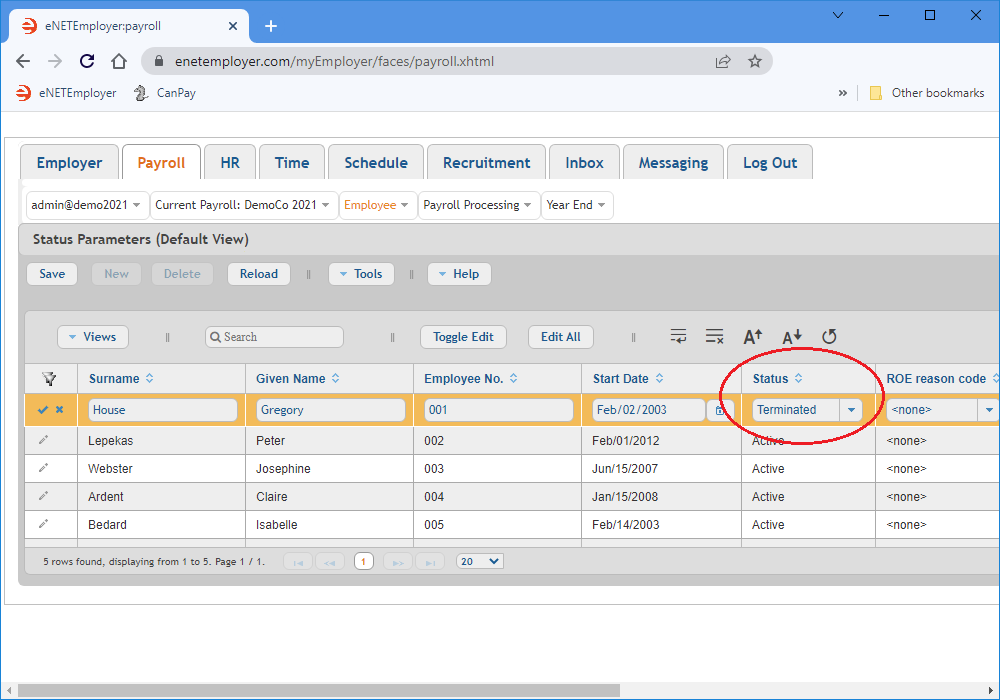
- Select the Terminated option. This closes the drop-down list and displays the chosen status for the employee.
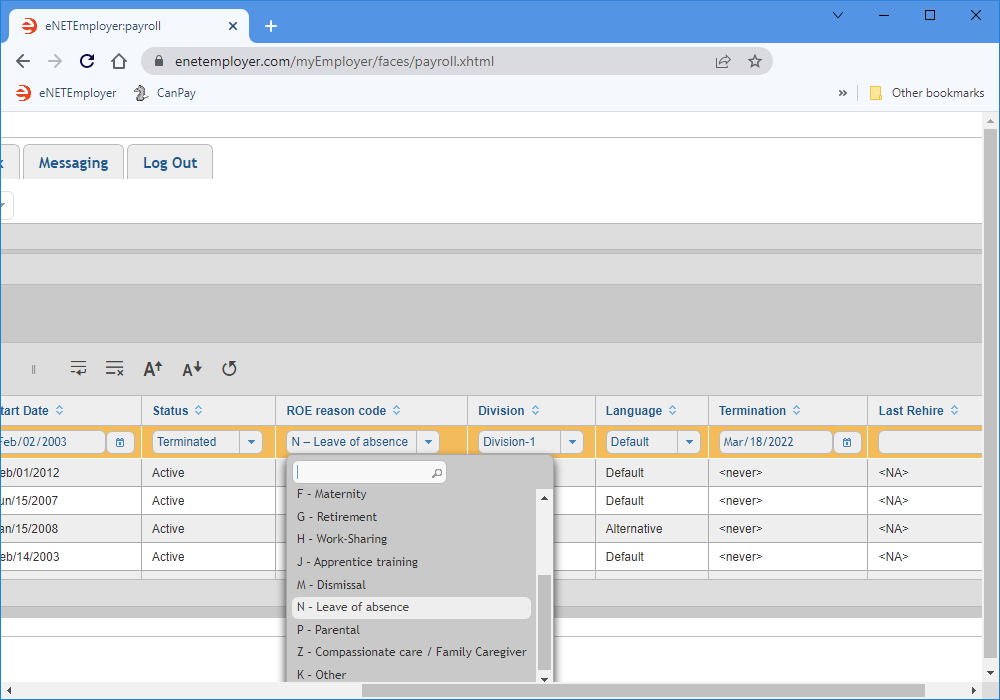
- Move to the ROE Reason Code cell, click the downward facing arrow, and then select desired code from the list provided.
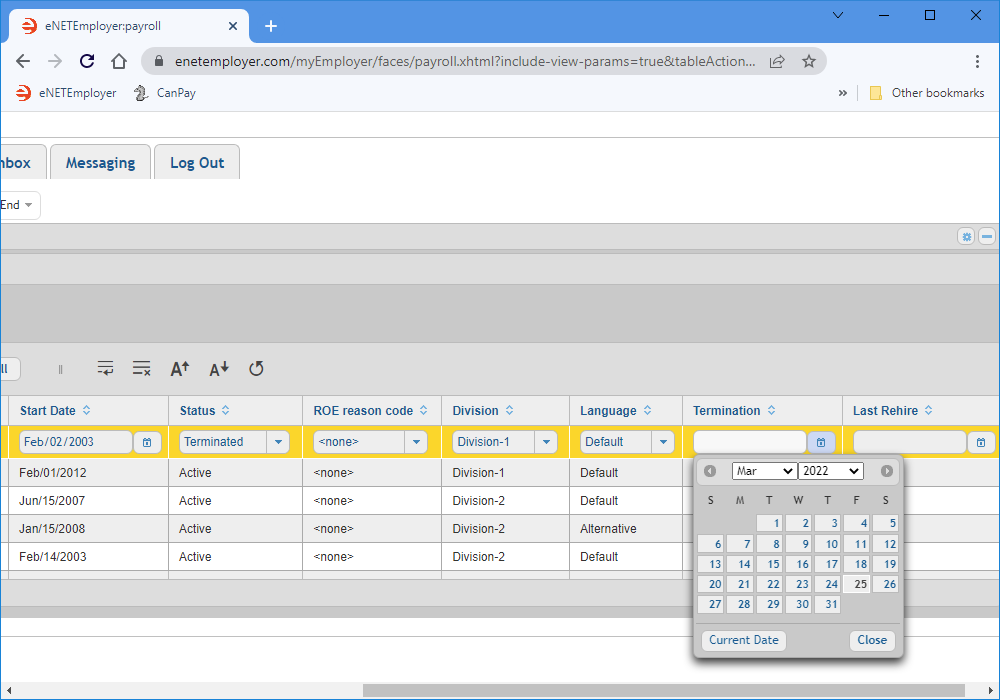
Example: In Fig. 04 below, we have chosen "N - Leave of Absence" as the reason for the employee's termination.
- Move to the Termination cell, click on the Calendar icon, then specify the employee's final date of employment.
- Now that you've set the employee's Status, Reason Code, and Termination date, save the changes by clicking on the check mark icon at the left side of the row (the Save icon).
With the employee Terminated, you can now preview the ROE.
To Create a Printed ROE (for preview purposes only):
- From the Payroll tab, open the Payroll Processing - Reports screen.
- Click on the downward arrow that appears to the right of the New button. This displays a menu with a number of common report types that are available for use with your payroll.
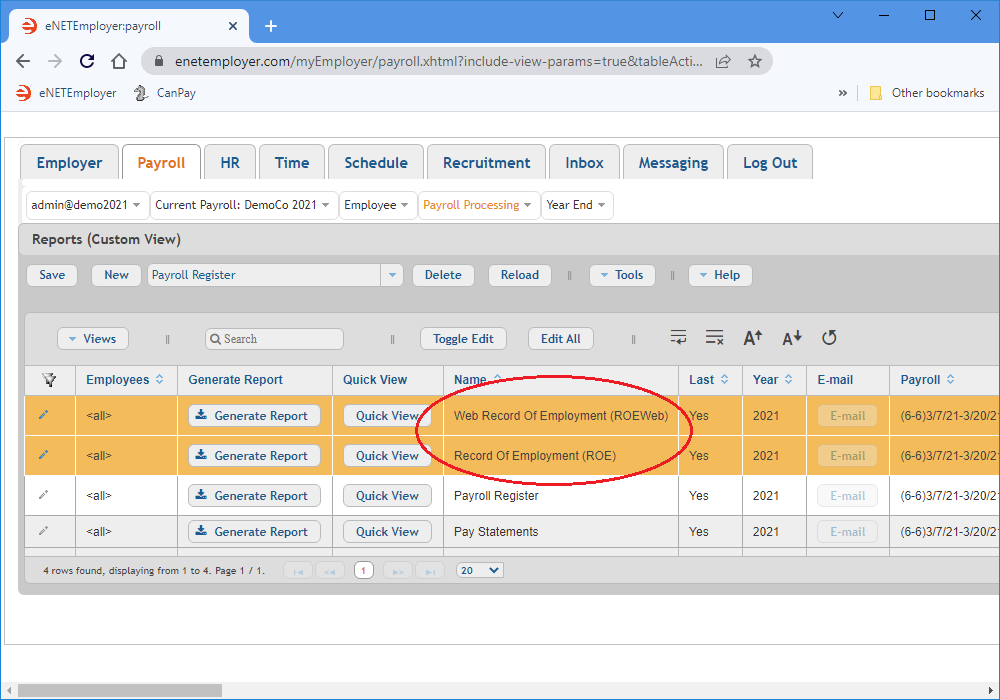
- Select the Record of Employment (ROE) option from the list, and then choose the New button. This action inserts the selected ROE report into the table with its cells ready for editing.
- Repeat the preceding step but choose the Web Record of Employment (ROEWeb) option instead. You will now have the two reports that are needed in order to proceed with this lesson.
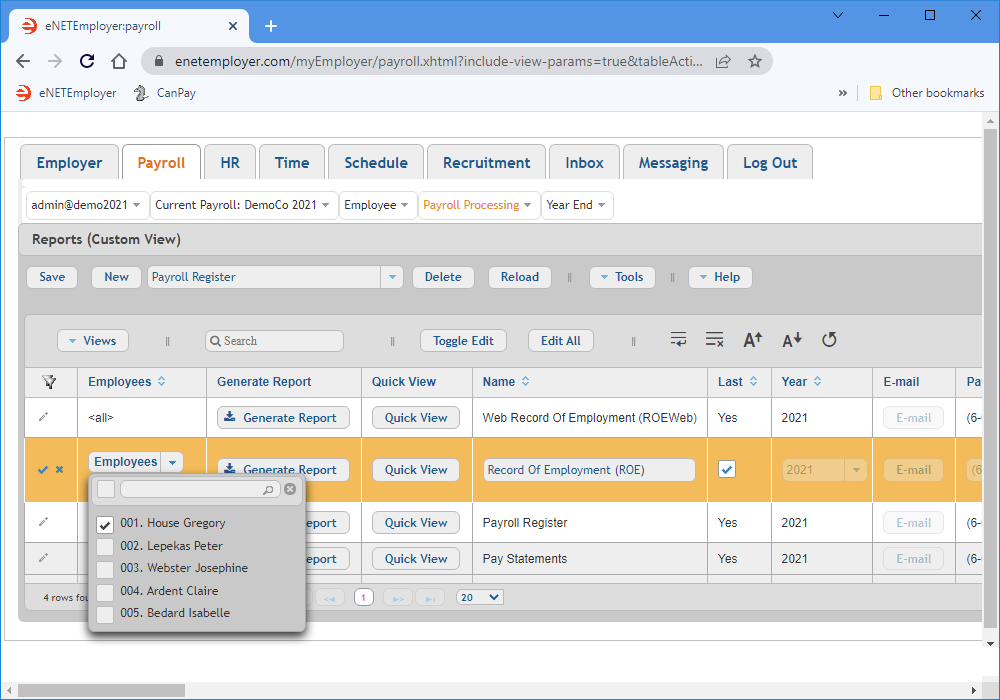
- Double-click on the Record of Employment (ROE) report row, and then click on the downward arrow in the Employees column (you may have to scroll to the right if the Employees column is not in view). This displays a list of the employees in the payroll.
- Click on the desired employee(s) for whom you wish to issue an ROE.
Example: In Fig. 07 below, we have chosen one employee for our ROE report - Gregory House.
- Once you have selected the employee, close the list by selecting the "X" icon near the top of the list. Only the selected employee(s) will be included in the report.
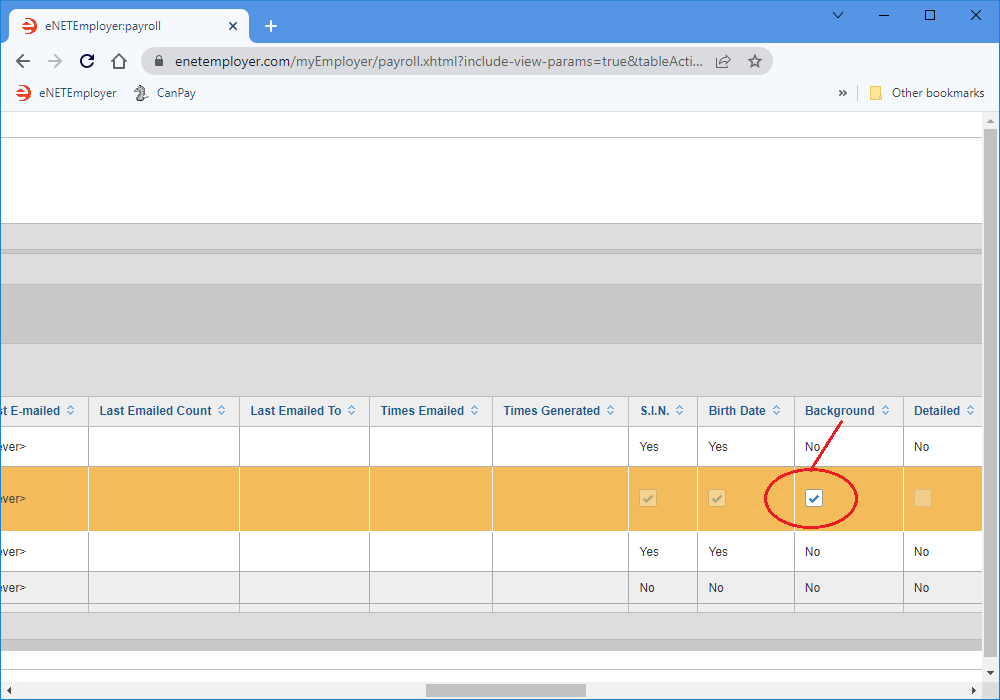
- Scroll the to right until you see the Background cell, and then ensure that a check mark appears in the box. This will ensure that the familiar ROE form will appear as the background when the report is created.
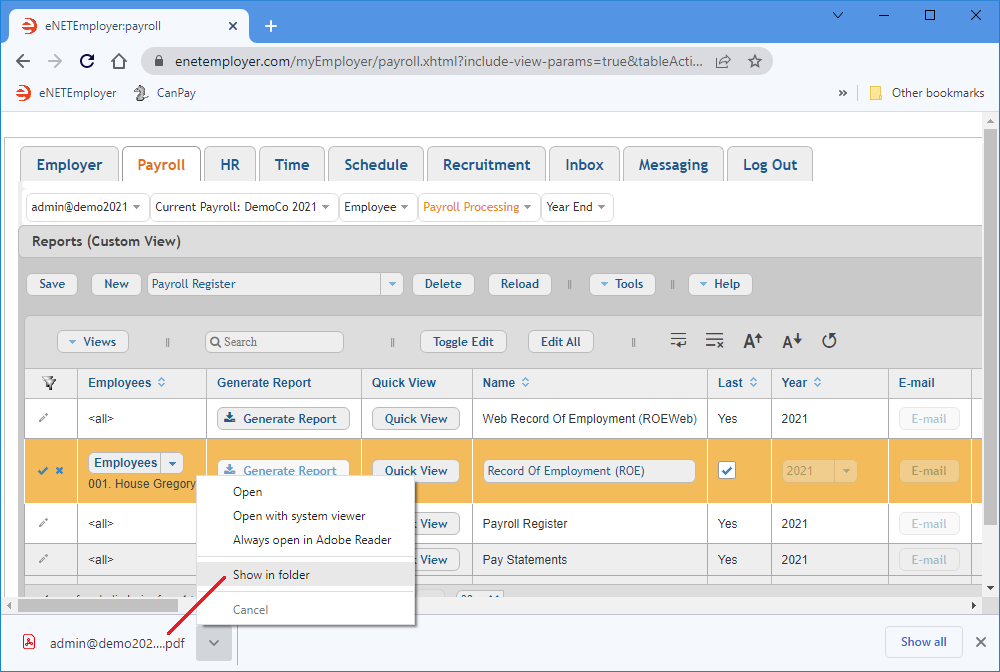
- Select the Generate Report button on the Record of Employment (ROE) report row. A brief message is displayed as the program uses the employee's payroll information to create the ROEWeb data file. Once the process is complete, the file is stored in your Downloads folder by default (unless you have changed your browser's download settings).
- Depending on the browser you are using, the downloaded file will either
appear as a link at the bottom of your screen (as it does in the Google Chrome browser shown below), or it may appear as a link near the top of your browser, as it does with FireFox, Edge and others.
Example: In Fig. 09 below, Google Chrome users can click on the Show in Folder option to navigate directly to the location where the file was saved.
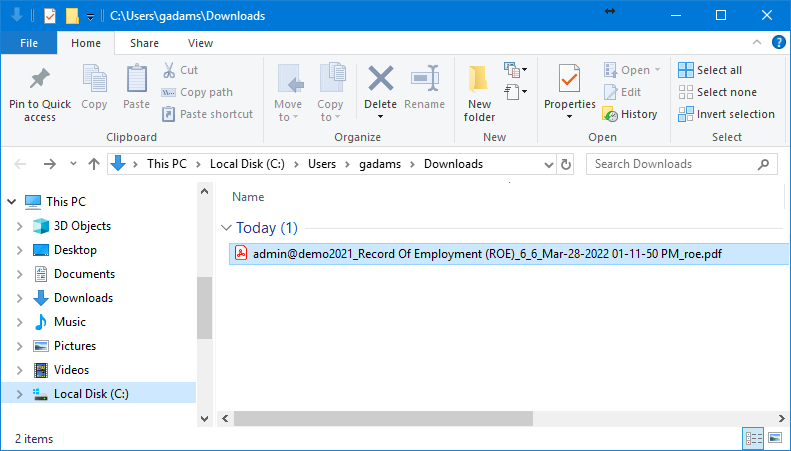
- Open your Downloads folder (or your custom download location) to view the generated ROE report.
Example: In Fig, 10 below, we have navigated to location where the file was saved - our Downloads folder.
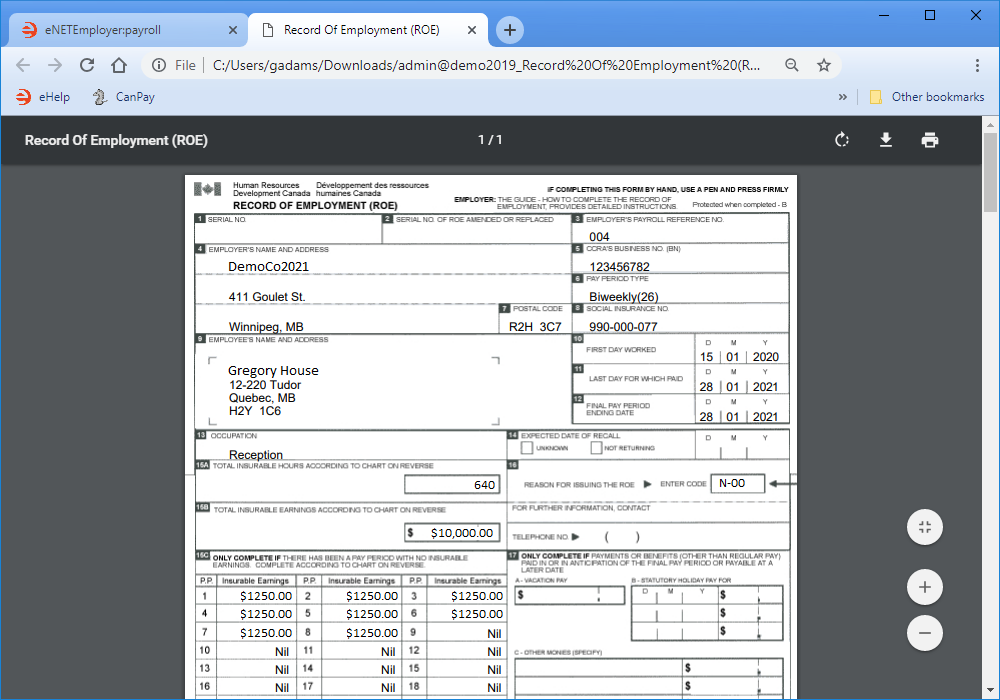
- Double-click on the PDF file (or right-click on its name and choose the Open command) to view the ROE report's information.
Adding ROE Report Rows to your Screen - Depending on your account settings, your report screen may or may not contain the two ROE-related report rows needed for the remaining sections of this tutorial - the Record of Employment (ROE) and the Web Record of Employment (ROEWeb). If you do not already see these ROE reports, you must add them as follows: |
For this tutorial, we will change the Employees setting to include only one employee who is to be issued an ROE.
As mentioned earlier, this report is for review purposes only. It cannot be used as an official document with Service Canada. Note: eNETEmployer does not include a serial number for this ROE Web draft - Service Canada assigns a serial number during the ROE Web upload process.
You can now move to the final section of this tutorial and create the actual ROEWeb file that can be used to file with Service Canada.
To Create an ROEWeb File:
As you did with the printable ROE report in the first part of this lesson, you will need to specify the employee for whom the ROEWeb file will be created.
- On the ROEWeb report row, move to the Employees column, and then place a check in the box of the employee for whom you will be creating the ROEWeb file.
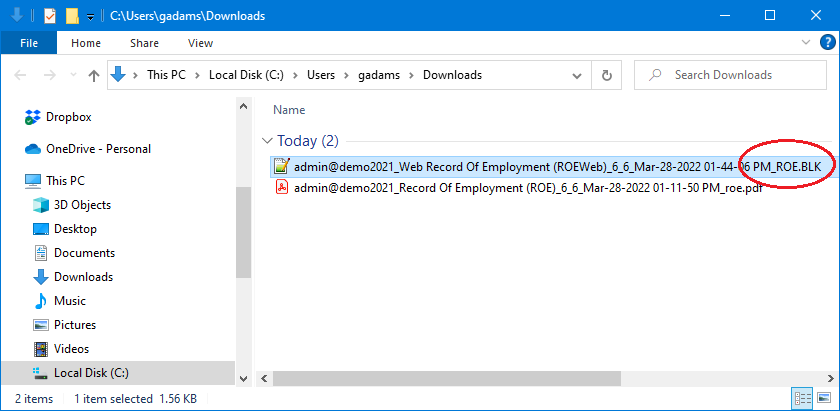
- Select the Generate Report button on the Web Record of Employee (ROEWeb) report row. This creates a file with the .BLK extension, and the file is stored in your Downloads folder by default (unless you have changed your browser's download settings).
- Navigate to the folder where the file was saved in order to view the generated ROEWeb .BLK.
Next Steps: The ROE file (.BLK) created here is used as a draft and must be uploaded to the Service Canada website. Visit the following link where you can create an account (if you don't already have one), and submit the .BLK file online: https://www.canada.ca/en/employment-social-development/programs/ei/ei-list/ei-roe/access-roe.html.
Video Tutorial - Visit the following link for an excellent step-by-step tutorial on how to upload your payroll extact file:
https://www.canada.ca/en/employment-social-development/programs/ei/ei-list/reports/payroll-extract.html
See Also
- Reports Overview
- Payroll Reports
