Help Toolbar (select a button to browse other online help sections) Home Tutorials Resources Search Tabs & Menus Button Bar Table & Data Display |
Assigning Employee Earnings Manually
For this tutorial, we will show you how to manually assign earning records to your employees. Note: If you used an employee template to add your employees to the payroll and if the template included one or more earning items, then the corresponding earnings will already be assigned to each employee.
Looking to assign employee earnings using a template? If you wish to assign employee earnings in an automated manner using an employee template, refer to the Assigning Employee Earnings using a Template tutorial. |
Earnings control the wages for each employee. eNETEmployer provides two main earning types; Hourly and Salary (see below for a description of each type). Earning records store each employee's year-to-date values and the earning cannot be removed once a pay sequence has been closed.
- Hourly - This type of earning is used when you require earning units that must be multiplied by a value in order to calculate the payment amount. For example, the Hourly Rate multiplied by the number of hours worked, or Miles Driven multiplied by the rate per mile. Hourly earning types require that you enter the number of hours that the employee has worked each pay period. If you do not enter the work hours, eNETEmployer will assume that the employee did not earn any wages for the period. Note: By default, hourly earnings are set to "Clear on Close" so that the hours will be zeroed out when the pay run is closed.
- Salary -Salary earning types are used when you need to enter a specific payment amount (as opposed to the number of hours worked). Unlike Hourly earnings, the default "Clear on Close" setting for salary types is set to "No". This means that the payment amounts for salary earnings will be carried over each successive pay period.
eNETEmployer allows you to work with salary earnings in two ways:- For Fixed Amounts - When the earning amount does not change each pay period you can enter its fixed amount. This would include such types as salaries, cell phone allowances, or any recurring amounts that are paid each period.
- For Amounts that are automatically calculated - Certain types of earnings do not require you to enter an amount, but rather the program calculates it for you. An example would be a vacation earning where the payment amount is calculated by an accumulator.
Primary vs. Temporary Earnings - Each employee requires at least one primary earning type (sometimes referred to as a "Base" earning). Their primary earning is typically used to calculate their wages on a regular basis. However, you may encounter instances where the employee will be working for a different wage amount for one or more pay periods. In this case, you could leave their primary earning unchanged and instead assign a temporary earning of the same type. This temporary earning can then be used to adjust or override the amounts for the current or subsequent pay periods. ![]() View a step-by-step tutorial on this feature
View a step-by-step tutorial on this feature
- Primary "Hourly" Earning - If an employee works variable hours each period, you would apply their work hours to their primary "hourly"-based earning. Other than the number of hours worked, it's assumed that the basic settings for this earning will not change from period to period.
- Primary "Salary" Earning - If an employee earns a fixed amount each period, you would assign them a primary "salary"-based earning. This earning would not change from period to period and its amount will remain in force until it is explicitly changed in the Earning Items screen.
This tutorial includes instructions for both Primary and Temporary earnings.
- Assigning a Primary Hourly Earning - Hourly earnings that occur regularly for each pay period.
- Assigning a Temporary Hourly Earning - Irregular or adjustment hourly earnings that are needed on a non-permanent basis.
- Assigning a Primary Salary Earning - Salary earnings whose amounts carry over for each pay period.
- Assigning a Temporary Salary Earning - Irregular or salary overrides that are needed on a non-permanent basis.
NOTE: Click on the images below to view them at full size
Assigning a Primary Hourly Earning
We will begin by assigning various Hourly earning types to your employees. As discussed earlier, hourly earning types are used for employees whose hours may vary each pay period.
- From the Payroll tab, open the Employee - Earning Items screen that is used to assign and control the earnings for each employee in the payroll.
- Using the drop-down menu that appears beside the New button (above the table on the left side), choose the employee who is to be assigned the earning, and then select the New button. This action adds a new employee row into the table and assigns
the employee a default earning.
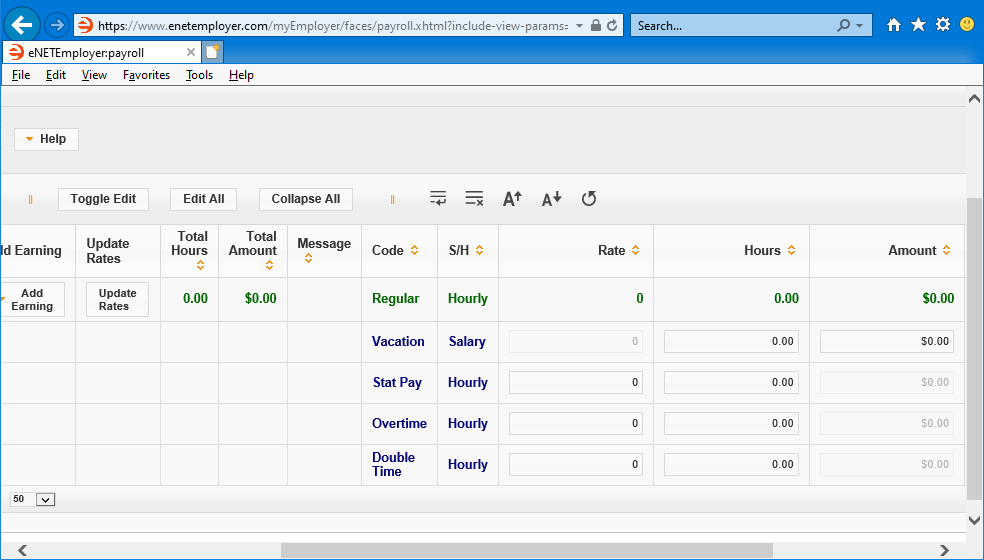
Example: In our example (see Fig. 01 below), the employee is Gregory House and he has been assigned a default Regular hourly earning). Note: The assigned default earning may or may not be applicable to the employee, depending on how they are paid (i.e. Hourly vs. Salary).- If the default earning is an "Hourly" type and is acceptable for this employee, continue to the next step so that you can add additional hourly earnings for the employee as needed.
- If the default earning is a "Salary" type and/or is not-applicable for this employee, you can leave the redundant earning in place and delete it later after you have added your desired hourly-based earnings for the employee.
- Tip: You can avoid having this "redundant" default earning appear by using an employee template to assign your employee earnings.
- To assign additional hourly earnings, select the Add Earning button and then choose the desired item from the drop-down menu that appears. This action assigns the chosen earning to the current employee. Note: Earning items that appear in this list are created in the Earnings screen (accessible via the Current Payroll - Earnings menu command).
Example: In Fig. 01 below, we have a number of available earnings that can be assigned, including both Hourly and Salary types. - Repeat the preceding step to add additional earnings based on your payroll scenario (press <F1> to use the Online Help system if you need to look up a definition for the various cells).
As you assign each earning, both earning types (Hourly and Salary) offer a number of settings that will be used to calculate the earning amounts for each employee: - Hourly Earnings - Hourly earnings will have their respective Rate and Hours cells enabled so that you can define a custom amount for each employee. For example, if the employee earned $20.00 per hour and worked a typical 80 hour pay period, you would enter 20 and 80 respectively in these two fields. After each pay period is closed, the value in the Hour cell is cleared (zeroed out) and can be reentered for the subsequent pay period. This is necessary since an hourly employee may not be working the same amount of hours in each subsequent pay period.
A faster way to enter regular hours- Although the Earning Items screen allows you to enter your Hourly employee work hours, many users prefer to use the Speedy Update screen instead. The Speedy Update screen makes the hours entry process more efficient by simplifying the options and including only those that pertain to regular hours entry (but not salary). Refer to the Enter Employee Work Hours with Speedy Update tutorial or see Step 5 of the Quick Start Guide for more information.
- Salary Earnings - Salary types will have their respective Hours and Amount cells enabled so that you can define a custom amount for each employee. For example, if the employee earned $52,000 per year and worked a typical 80 hour pay period, you would enter 2000 and 80 respectively in these two fields. After each pay period is closed, the Salary earning type will remember the value entered in the Hours cell since it is a recurring amount (though you can override if needed).
The top row for each employee is referred to as the Primary row and is displayed in Green text, and each sub row appears in Black text. Note: If you cannot see the sub rows for each employee, choose the Expand icon - the right-facing triangle at the beginning of the row - to reveal their sub rows.
Example: In Fig. 02 below, we have assigned five Hourly-based earnings to our sample employee.
Setting Multiple Earning Rates Automatically
Once you have assigned your earnings to each employee, you need to set the various rates for each earning. If one or more of your earnings have the "As Rate Of" setting assigned (see note below), then you can set the rates for these earnings automatically using the Update Rates button. Note: If you have not used the "As Rate Of" setting for your earning, you can skip this section.
The "As Rate Of" Earning Setting - When you create hourly earning types in the Earnings screen, you have the option of assigning the earning rates manually for each employee or to have the earning rates based on the rate of another earning (typically, the employee's primary earning). The latter method is very efficient because it allows you to change the primary earning and then to update the rates for associated earnings with one click of the Update All Rates button (explained below). |
- Move to the Rate cell for your Regular earning and enter the numerical value that represents the employee's hourly wage.
- Select the Update All Rates button that is located above the table. This action will assign the factored rates for any earnings that are set to "As Rate of" the employee's base earning.
If you have any rates that are not associated with the employee's Regular earning, you can set the rate manually as needed.
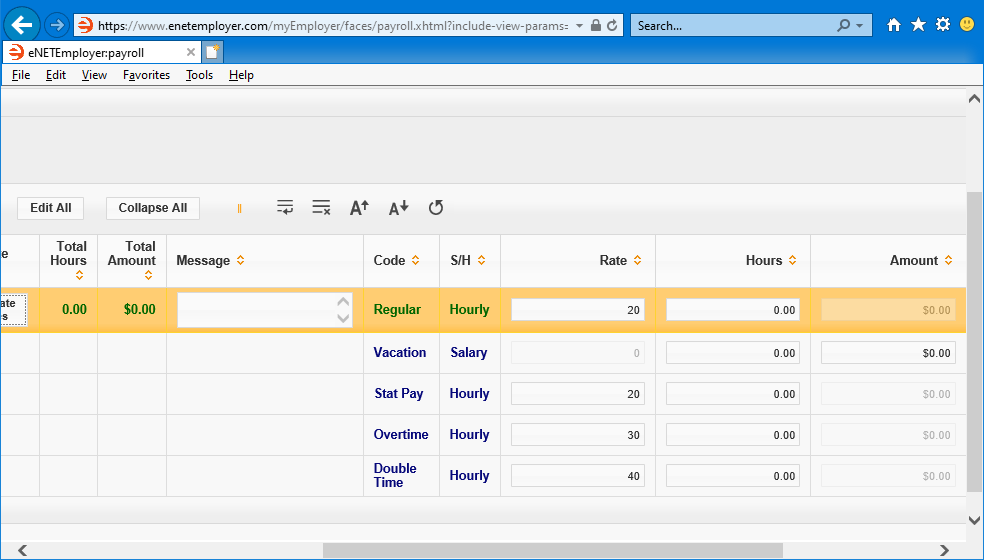
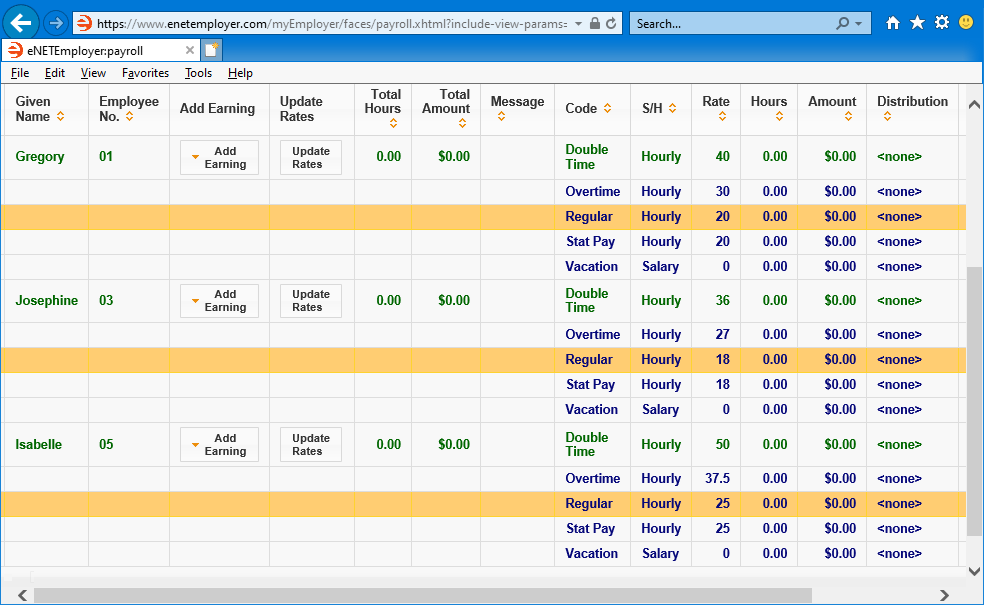
Example: Fig. 03 below shows that the employee earns $20 per hour and three of his other earnings are based on a factor of his Regular rate. Overtime is calculated at 1.5 times his regular rate, Double Time is 2 times his regular rate, and Statutory Pay is 1 times his regular rate. Therefore, when we enter 20 in his Regular earning cell and choose the Update Rates button, the new results change to read Overtime at $30 per hour, Double Time at $40 per hour, and Statutory Pay at $20 per hour.
Note: The Vacation Pay rate is not defined here because it is calculated based on a function (if you are working through the Quick Start Guide, this was discussed earlier in lesson 3F and 3G (Step B)).
Changing employee pay rates- You must remember to choose the Update All Rates button each time you make an adjustment to the employee's Regular rate. If you do not, then any earnings whose values are based on the Regular earning will not have their rates adjusted accordingly.
- Save the Regular sub row and then use the Collapse icon (the downward-facing triangle at the beginning of the row) to hide the sub rows for the edited employee.
- Using the preceding method, continue entering the rates for your additional employees.
Example: In our example below, we have set the Regular rate for Josephine to 18 per hour and set Isabelle's Regular rate to 25. After choosing the Update All Rates button for each of these two employees, their rates are automatically filled in as needed (see the table below along with Fig 04).
Surname Given Name Code S/H Rate Webster Josephine Double Time Hourly 36 Vacation Salary 0 Overtime Hourly 27 Statutory Pay Hourly 18 Regular Hourly 18 Bedard Isabelle Double Time Hourly 50 Vacation Salary 0 Overtime Hourly 37.5 Statutory Pay Hourly 25 Regular Hourly 25 - Save each row and sub row when you are complete.
Assigning a Temporary Hourly Earning
We will now continue the tutorial by discussing temporary earnings that can be used to make adjustments to an employee's primary hourly earnings for the current pay period or for multiple periods if necessary.
What are Temporary Earnings? - If you need to adjust an employee's normal earnings and do not wish to modify the associated earning record, you can use a temporary or tertiary earning. These earning types can be set to replace the normal earning entirely for one or more pay periods, or can be used in addition to the employee's regular earning. For example, if the employee has a Regular earning of $2000 per period and you wish to increase it by $500 for the next pay run only, you would add a temporary Regular earning type and enter $2500 as its amount and then you would place a check in the Overriding checkbox. This will instruct eNETEmployer to calculate the temporary earning for the employee wages, and disregard the primary (normal) earning record. Note: The temporary earning has a checkbox entitled Temporary. This checkbox is activated automatically so that the temporary earning will be deleted after the current pay run. If you wanted the temporary earning to continue past the current pay period, you would deactivate the Temporary option. |
- From the Payroll tab, open the Employee - Earning Items screen that is used to assign and control the earnings for each employee in the payroll.
- Select the Add Earning button for the employee who will be receiving the earning adjustment, and then choose the desired hourly earning from the down menu that appears. This action adds a new earning sub row into the table. The temporary earning appears in a Black Italic font to indicate that another item of its type already exists for the current employee.
- Move to the Rate cell for the new earning sub row and adjust the rate amount as needed.
- If the temporary earning is to replace the normal "regular" earning, ensure that you place a check in the Overriding checkbox. This will instruct the program to "delete" the temporary earning after the current pay period is closed.
- If the temporary earning is to be used for more than one pay period, remove the check from the Temporary checkbox. This will instruct the program to leave the temporary earning in force until you explicitly deactivate the Temporary option for a future pay period.
- Save the row once you have completed editing the information.
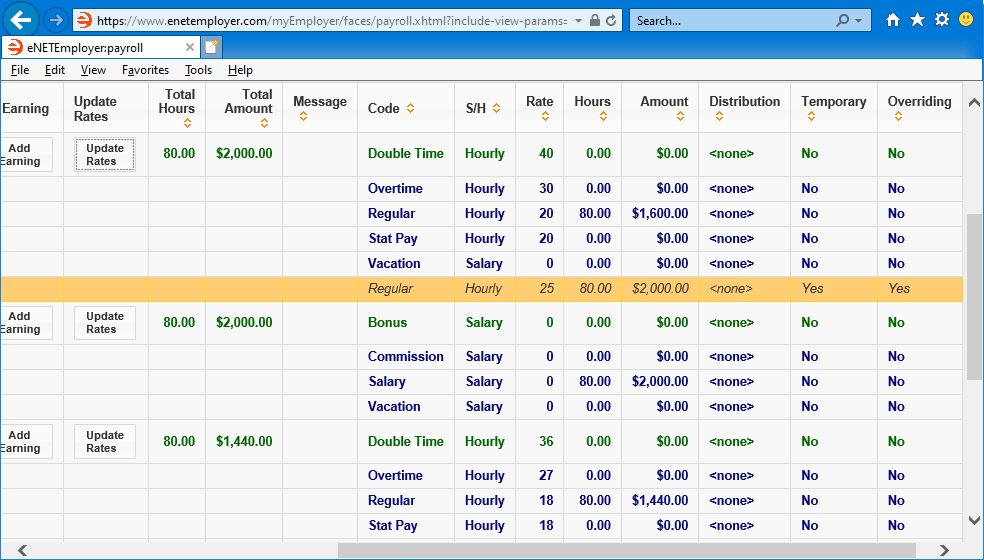
Example: In our example below, employee Gregory House has a regular hourly rate of $20.00, however, he has filled-in for his supervisor for the two-week period and is entitled to be paid at $25.00 per hour for the 80 hours. Therefore, we have added a temporary earning that will be used for the current pay period only (i.e. the Overriding checkbox has been set to Yes). The earning's Rate cell has been adjusted to $25.00, resulting in a payment of $2200.00 for the period (up from his regular $1600.00 amount). - Repeat the preceding steps each time you need to make an hourly earning adjustment.
We will now continue the tutorial by discussing how to assign fixed Salary earnings.
Manually Assigning a Primary Salary Earning
Salary earnings are used for employees whose earning amounts carry over each pay period. Once you define an employee's salary amount, eNETEmployer will continue to calculate the same payment amount for each successive pay period.
- From the Payroll tab, open the Employee - Earning Items screen that is used to assign and control the earnings for each employee in the payroll.
- Using the drop-down menu that appears beside the New button (above the table on the left side), choose the employee who is to be assigned the salary earning, and then select the New button. This action adds a new employee row into the table and also assigns
a default earning to the employee. Note: The assigned default earning may or may not be applicable to the employee, depending on how they are paid (e.g. Hourly vs. Salary).
- If the default earning is an "Salary" type and is acceptable for this employee, continue to the next step so that you can add additional salary earnings for the employee as needed.
- If the default earning is a "Hourly" type and/or is not-applicable for this employee, you can leave the redundant earning in place and delete it later after you have added your desired salary-based earnings for the employee.
- Tip: You can avoid having this "redundant" default earning appear by using an employee template to assign your employee earnings.
- To assign additional salary earnings, select the Add Earning button and then choose the desired item from the drop-down menu that appears. This action assigns the chosen earning to the current employee. Note: Earning items that appear in this list are created in the Current Payroll - Earnings screen (accessible via the Current Payroll - Earnings menu command).
Example: In Fig. 06 below, we have a number of available earnings that can be assigned, including both Hourly and Salary types.
- Move to the Amount cell for each salary earning and enter the full amount of salary for which the employee is entitled for each pay period. For example, if your employee earns $52,000 annually and the pay period is set to Bi-weekly, you would enter $2000 in this cell.
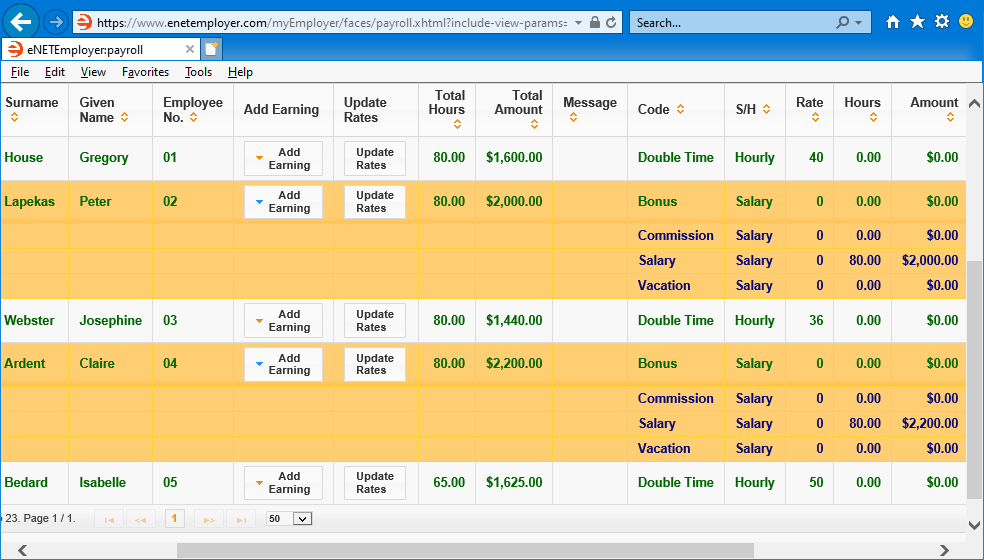
Example: In our example below, we have added two salaried employees (Peter Lepekas and Claire Ardent ) and have used the Amount cell to define their respective salary amounts per pay period.- Peter earns $50,000 per year, therefore we entered $2000 in his Amount cell as this amount represents his rate of pay for each two-week period (i.e. $2000 x 26 pay periods = $50,000). Claire's $57,200 annual salary is entered as $2200 per pay period.
- In the Hours cell, we have entered 80 for each employee to represent the amount of hours they will work each period. Since salary-based employees are typically paid the same wage each period regardless of how many hours they work, the number of Hours you
enter here will have no effect on the amount that they are paid. However, this amount is important in order to ensure that the EI Insurable Hours are calculated correctly for ROE purposes.
- Save each row and sub row when you have finished entering the information.
| Surname | Given Name | Code | Hours | Amount |
|---|---|---|---|---|
| Lepekas | Peter | Bonus | 0 | 0 |
| Salary | 80 | 2000 | ||
| Commission | 0 | 0 | ||
| Vacation | 0 | 0 | ||
| Ardent | Claire | Bonus | 0 | 0 |
| Salary | 80 | 2200 | ||
| Commission | 0 | 0 | ||
| Vacation | 0 | 0 |
For this tutorial, we will leave the other salary earning types blank since each employee has not earned any bonus or commission income. Unlike the hourly-based earning types, the Update All Rates button is not applicable to Salary-based earnings. All salary income must be entered explicitly in the Amount cell for each earning type.
Manually Assigning a Temporary Salary Earning
We will now continue the tutorial by discussing temporary earnings that can be used to override the employee's primary salary earnings for the current pay period only (or multiple periods if necessary).
About Temporary Salary Earnings - If you need to adjust an employee's salary earnings for the current pay period, you can use an temporary or tertiary earning. These earning types can be set to replace the normal salary earning entirely, or can be used in addition to the employee's normal salary earning. For example, if the employee has a Salary of $2000 per period and you wish to increase it by $500 for the next pay run only, you would add a temporary Salary earning type and enter $2500 as its amount, and then you would place a check in the Overriding checkbox. This will instruct eNETEmployer to calculate the temporary salary earning for the employee wages, and disregard the original salary earning record. Note: The temporary earning has a checkbox entitled Temporary. This checkbox is activated automatically so that the temporary earning will clear itself after the current pay run. If wanted the temporary earning to continue past the current pay period indefinitely, you would deactivate the Temporary option. |
- From the Payroll tab, open the Employee - Earning Items screen that is used to assign and control the earnings for each employee in the payroll.
- Select the Add Earning button for the employee who will be receiving the earning salary override, and then choose the desired salary earning from the down menu that appears. This action adds a new earning sub row into the table. The temporary salary earning appears in a Black Italic font to indicate that another item of its type already exists for the current employee.
- Move to the Amount cell for the new earning sub row and adjust the earning amount as needed.
- If the temporary earning is to replace the normal salary earning, ensure that you place a check in the Overriding checkbox. This will instruct the program to "clear" the temporary earning after the current pay period is closed.
- If the temporary earning is to be used for more than one pay period, remove the check from the Temporary checkbox. This will instruct the program to leave the temporary earning in force until you explicitly deactivate its Temporary option for a future pay period.
- Save the row once you have completed editing the information.
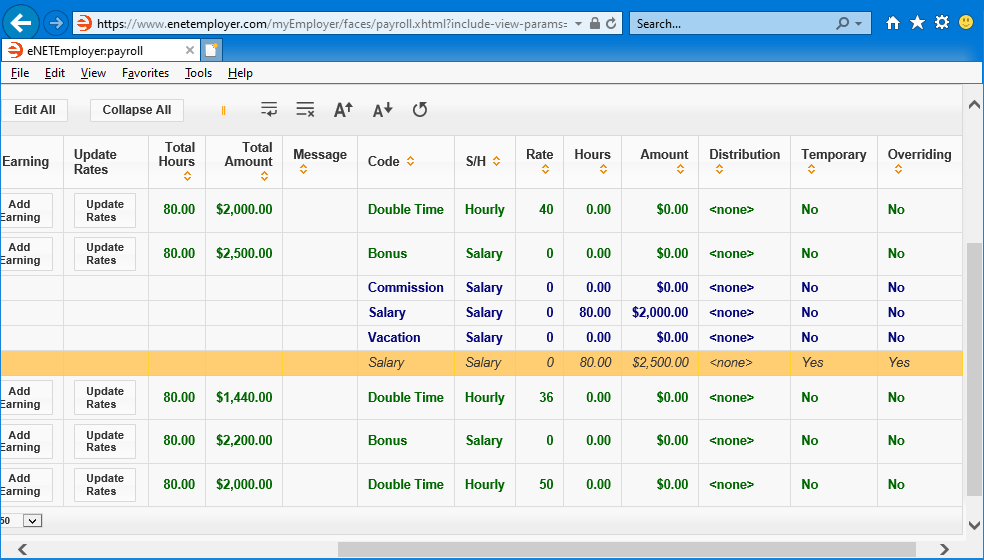
Example: In our example, employee Peter has a regular salary rate of $2000. However, he was underpaid by $500 on the previous pay period and is therefore entitled to the additional $500 to make up for the shortfall. Therefore, we have added a temporary earning that will be used for the current pay period only (i.e. the Overriding checkbox has been set to Yes). The earning's Amount cell has been adjusted to 2500, resulting in a payment of $2500 for the current period only. - Repeat the preceding steps each time you need to make a salary earning override as needed.
This completes the tutorial on manually adding employee earnings.
Note: If you are working through the payroll setup process in order, you will need to continue through the Employee menu to finish entering the data that is required for each new payroll employee.
See Also:
- Earnings overview
- Creating common earning types
- Working with advance earnings
- Adjusting pay rates in the middle of a pay period
- Paying an employee bonus using an Additional pay type
- Payroll earnings help topic
- Employee earnings help topic
- Assigning employee earnings manually
- Assigning employee earnings using a template
.png)
.png)
