Help Toolbar (select a button to browse other online help sections) Home Tutorials Resources Search Tabs & Menus Button Bar Table & Data Display |
Working with Advance Earnings (Advance Pay)
eNETEmployer allows you to pay your employees outside of your regular pay cycle using a wage advance. This can be useful in situations where an employee needs to receive a portion of their wages before the next regular pay period. A common example would be in a monthly payroll where an employee needs to have a portion of their wages paid partway through the period. With a wage advance, the employee receives the wage advance, then the advanced amount is recovered in a subsequent pay period.
Since advance earnings can be thought of as a "short-term loan", no withholdings are calculated for the advance, and the advance amount is excluded from the employee's T4. However, the wages must be reported eventually - typically as part of the next "normal" payroll cycle. This subsequent pay run will reflect the usual employee deductions for period, and the amount of the wage advance must be also be deducted from their pay.
In the following tutorial, we will work with a scenario where an employee requests a $500.00 wage advance to be processed for the current normal period. The wage advance will then be recovered (paid back) at the next normal pay run.
A wage advance requires the following steps:
- Step 1: Create an Advance Earning.
- Step 2: Assign the Advance earning to an employee.
- Step 3: Calculate the employee wage advance.
- Step 4: Create an Advance Deduction.
- Step 5: Assign the Advance Deduction to an employee.
- Step 6: Calculate the Advance deduction.
NOTE: Click on an image below to view it at full size.
Step 1: Creating the Advance earning
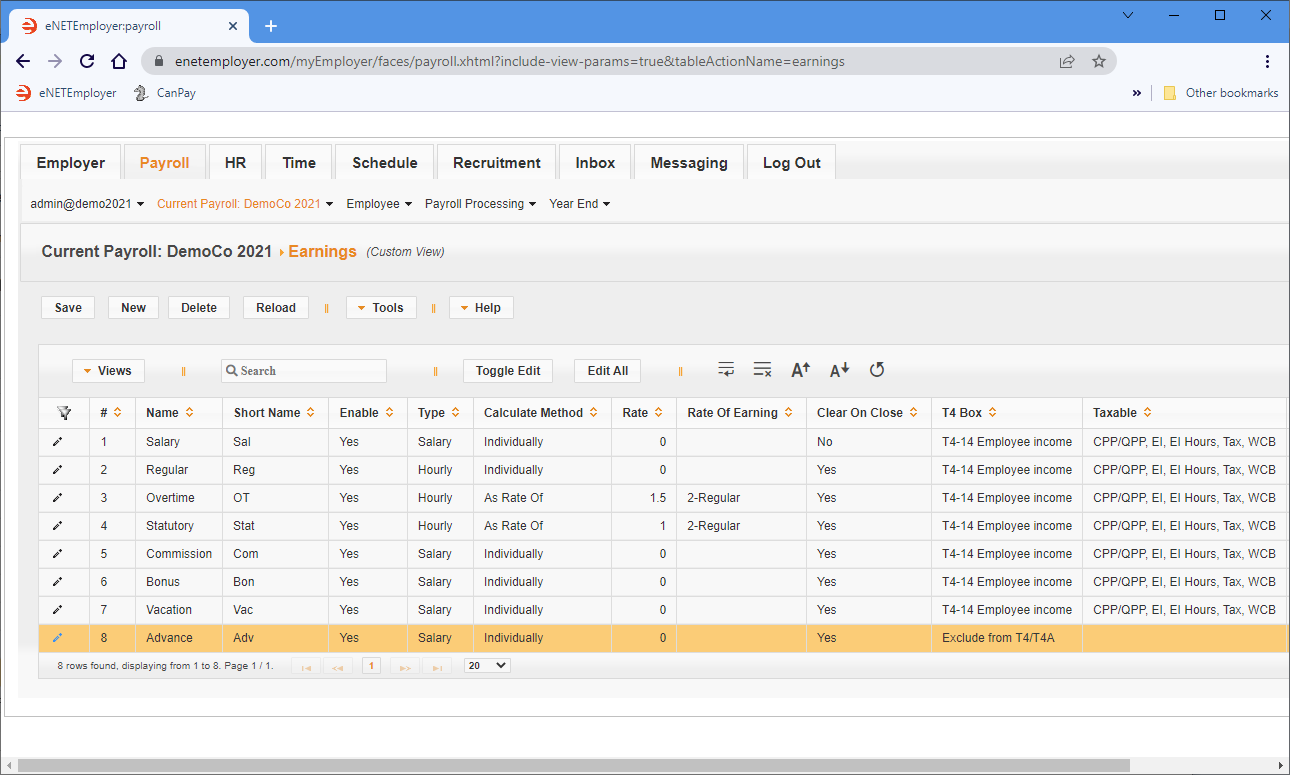
- From the Payroll module, open the Current Payroll - Earnings screen, select the New button to insert an earning row in the table, then enter both a Name and Short Name for the earning (e.g. "Advance").
- Move to the T4 Box cell and choose the Exclude from T4/T4A option. This will prevent the wage advance from being reported on the employee's T4 (the amount will be accounted for in the subsequent pay run).
- Move to the Taxable cell and remove the check from all of the boxes. This will prevent any withholdings from being applied to the wage advance amount (similar to the previous point, the withholdings will be accounted for in the subsequent pay run).
- Save the earning row changes.
Example: In Fig. 01 below, we have added the Advance earning to the payroll.
Now that the advance earning has been added to the payroll, you must assign it to your employee.
Note: You can skip this section if your payroll already has an Advance earning.
Step 2: Assigning the Advance Earning to an Employee
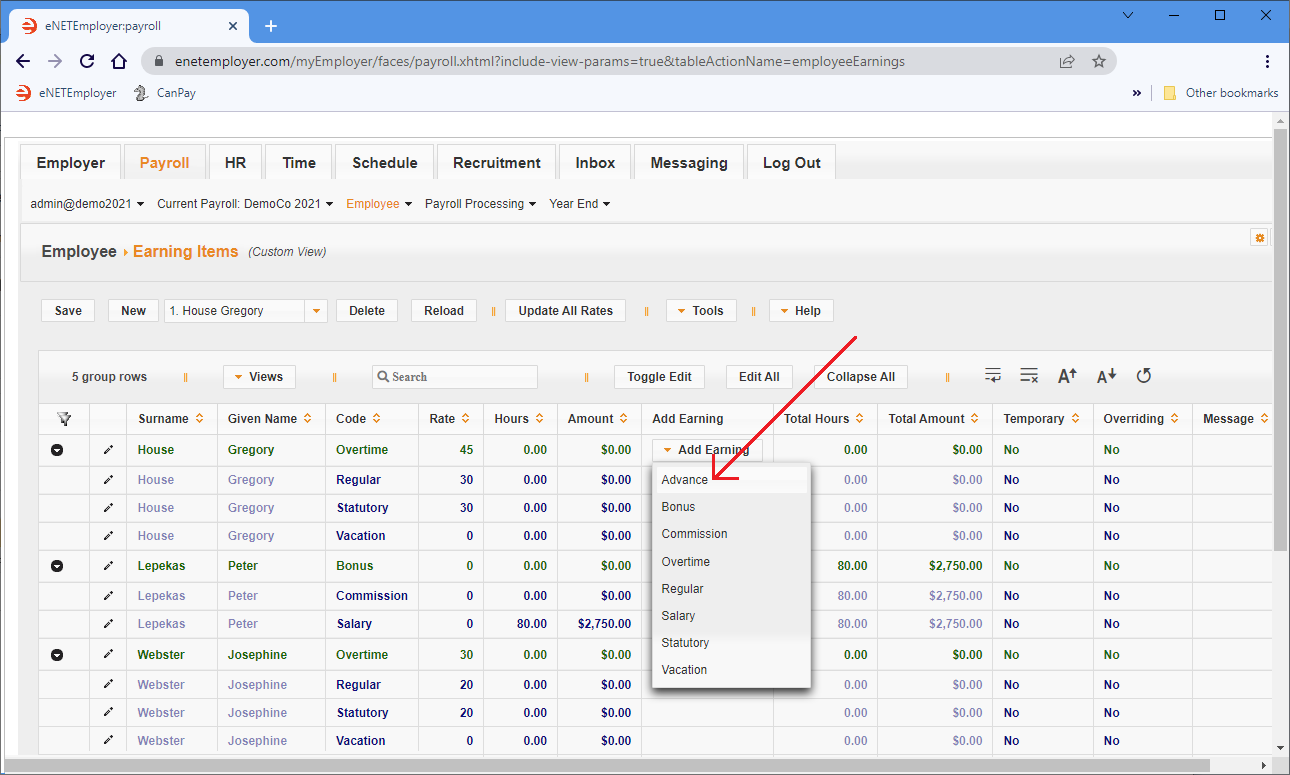
- From the Payroll module, open the Employee - Earning Items screen, locate the employee that will receive the advance earning, and then select the Add Earning button on their row. This displays a list of available earnings that can be assigned to the employee.
Example: In Fig. 02 below, we see the Advance earning in the list of available earnings to be added.
- From the drop-down list of earnings, choose the "Advance" earning that you created in the previous step. This adds the advance earning type to the list of available earnings for the employee.
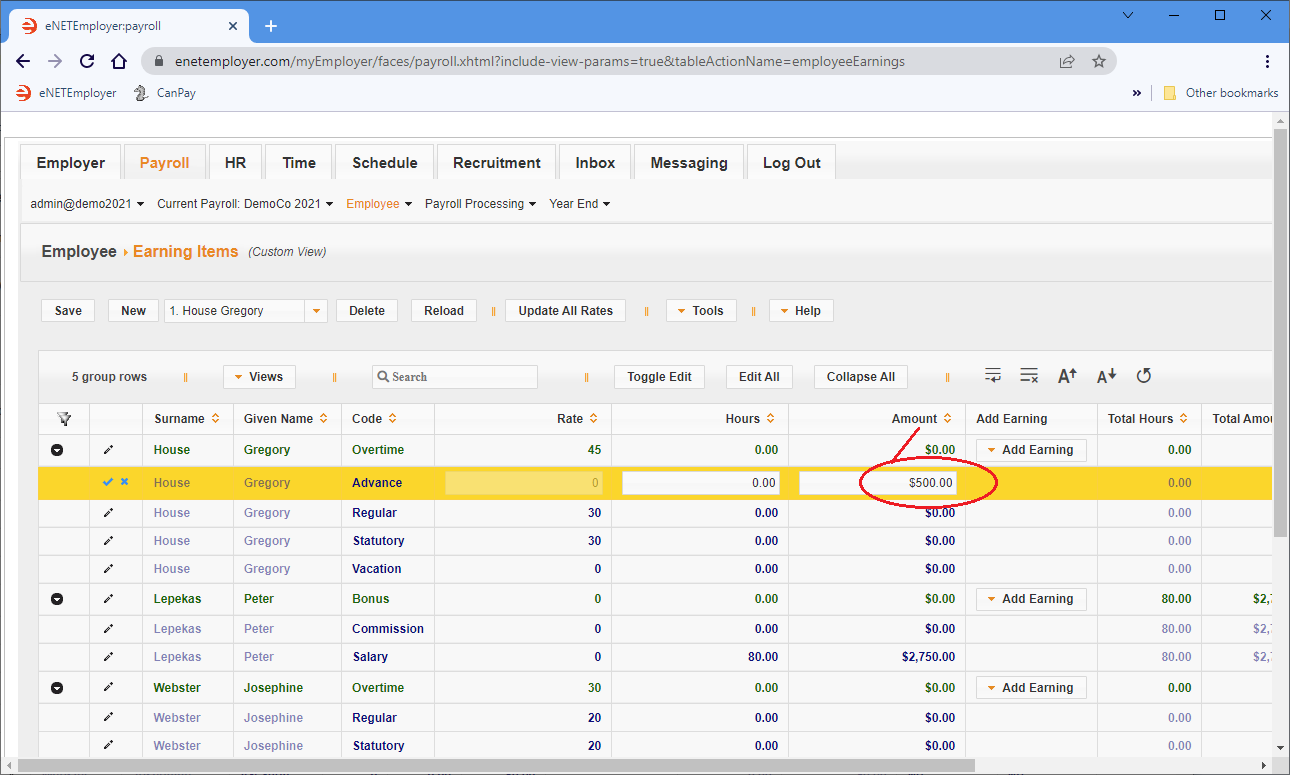
- Move to the Amount cell for the earning, enter the advance amount, then Save the earning row changes.
Example: In Fig. 03 below, we have added the Advance earning and entered a $500.00 amount.
Now you can calculate the payroll to view the wage advance.
Step 3: Calculating the Employee Wage Advance
- From the Payroll module, open the Payroll Calculations - Calculations screen, then choose the Calculate button.
- Once the payroll is calculated, choose the Generate Report button to create an interim Pay Register report as a .PDF document. Depending on your browser settings, the resulting document will either be stored in your Downloads folder or you may be presented with a window that will prompt you where to save the file. In most browsers, the document can be viewed via a link that appears at the top-right of your browser.
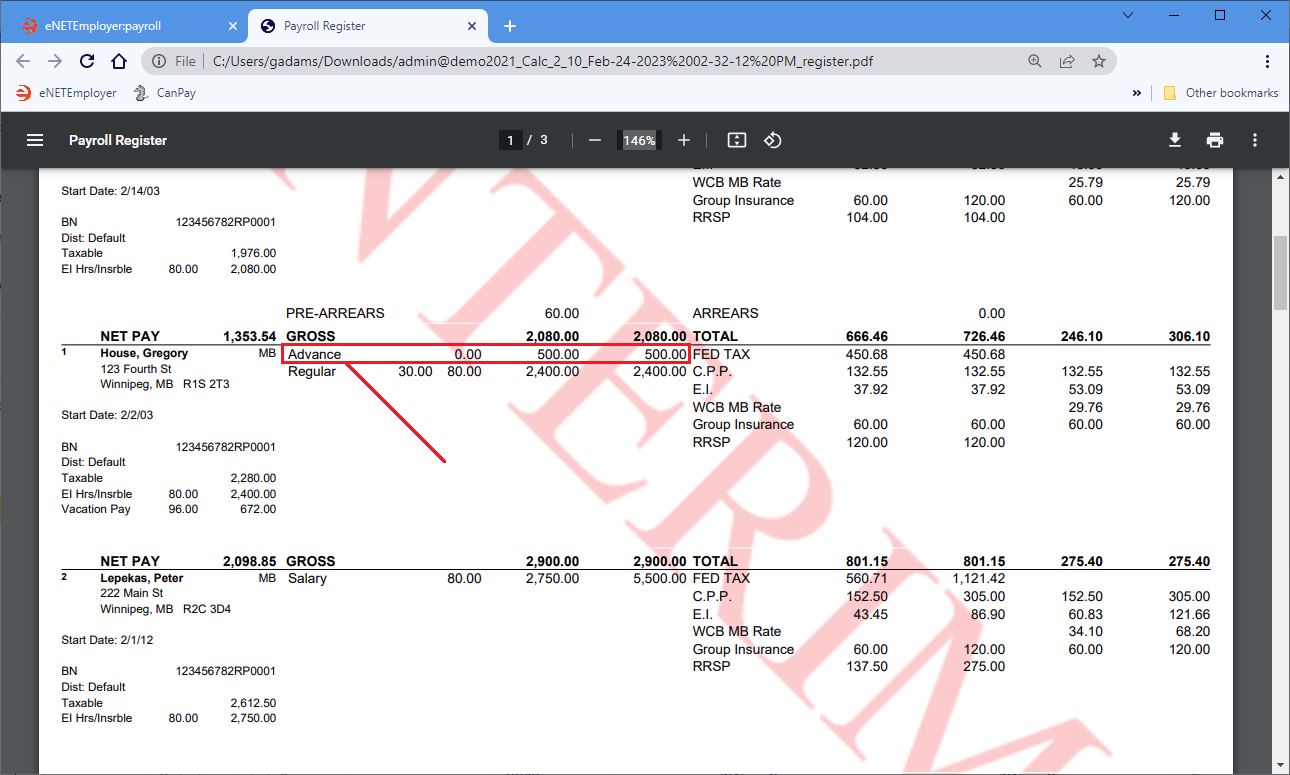
- Choose your preferred method to open the PDF report. When the report appears on the screen, locate the appropriate employee's section, and you will see the wage advance details.
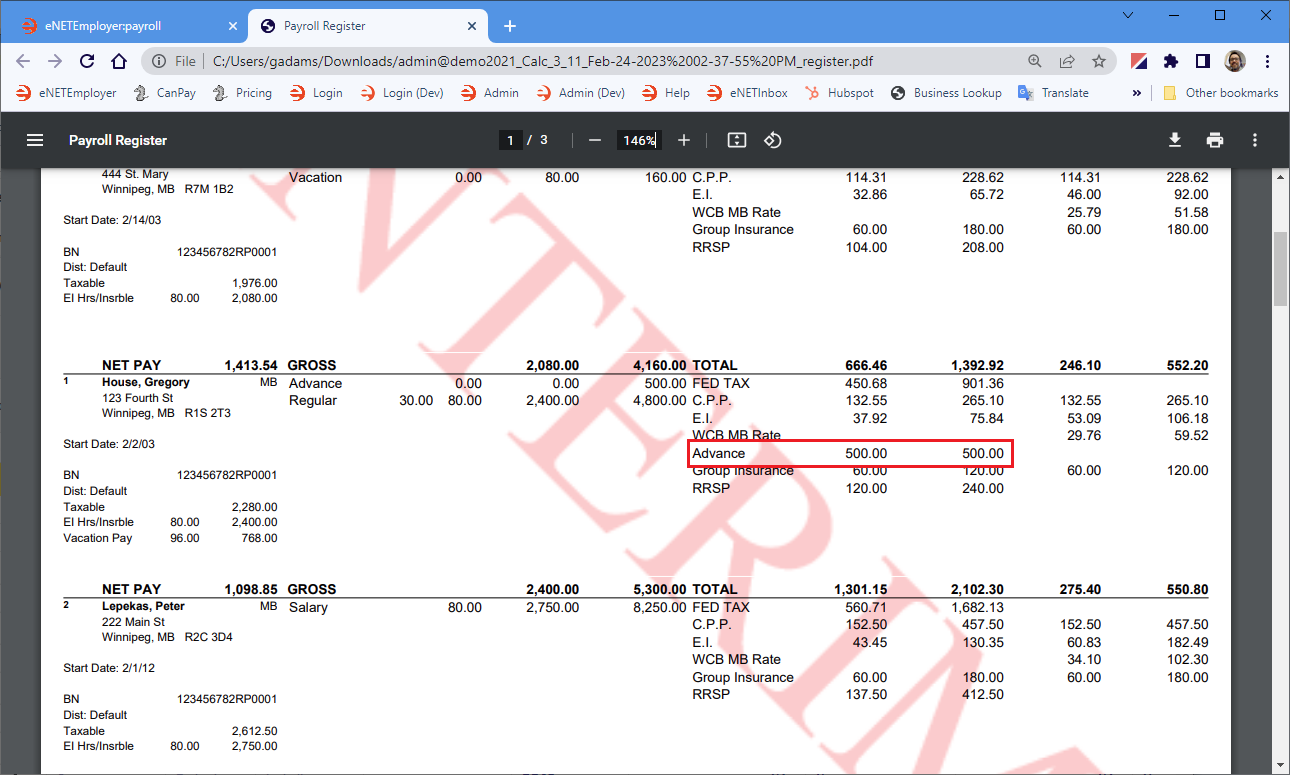
Example: In Fig. 04 below, we see that the employee has received the $500.00 wage advance in addition to their regular wage for the period.
- Once you have reviewed that the wage advance has been paid, you can backup and close the pay period as you would normally.
Now you can proceed to the final steps of applying the advance deduction in the next pay period so that you can recover the wage advance.
Step 4: Creating the Advance Deduction
For the remainder of this tutorial, we will assume that you have closed the prior pay period and are working with a new Normal period.
Note: You can skip this section if your payroll already has an Advance deduction.
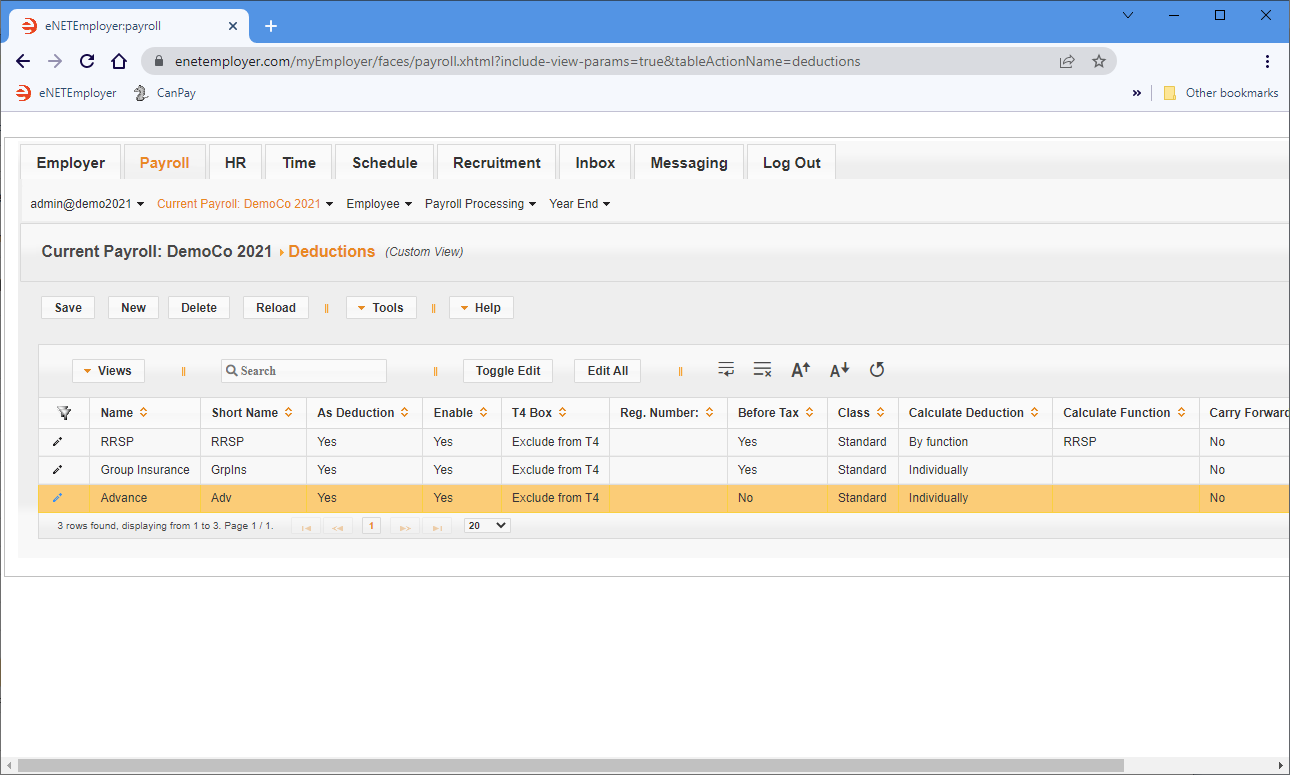
- Open the Current Payroll - Deductions screen, select the New button to insert a deduction row in the table, then enter both a Name and Short Name for the deduction (e.g. "Advance").
- Save the deduction row changes.
Example: In Fig. 05 below, we have added the Advance deduction to the payroll.
Now that the advance deduction has been added to the payroll, you must assign it to your employee.
Step 5: Assigning the Advance Deduction to an Employee
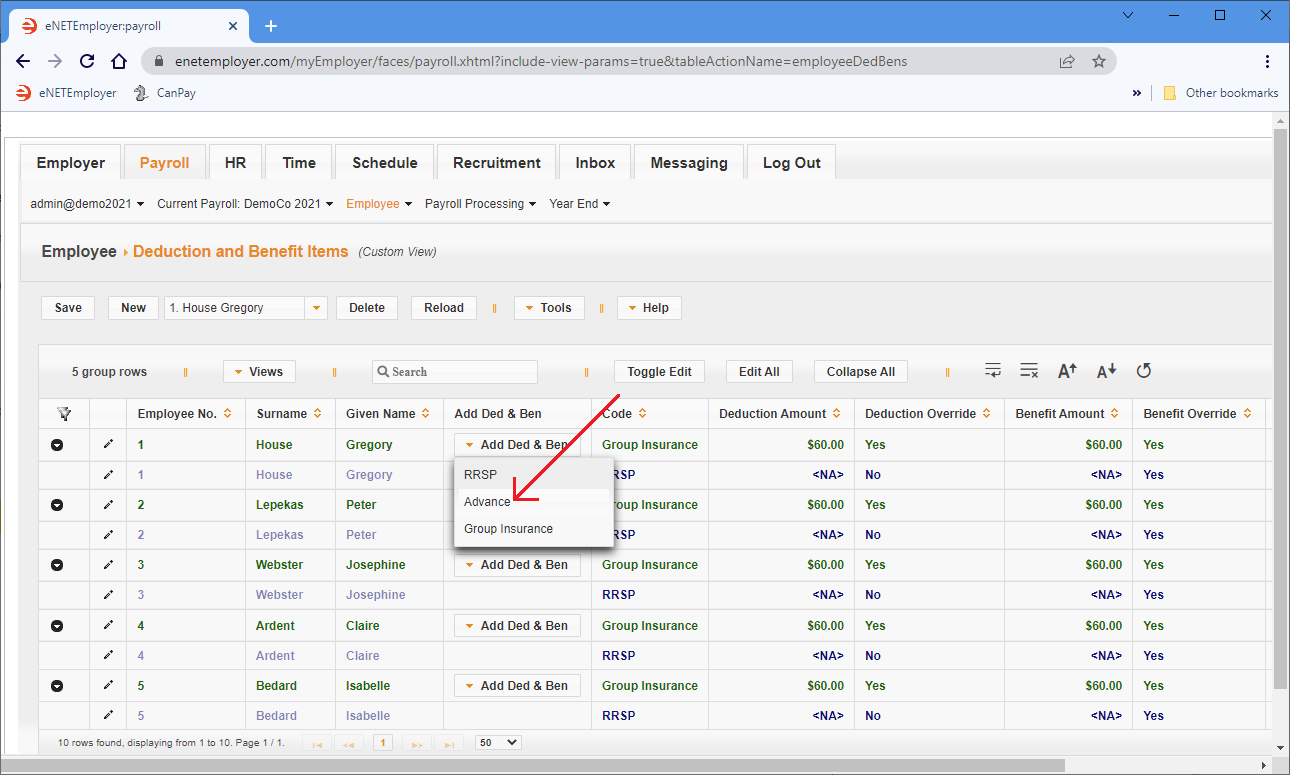
- Open the Employee - Deduction and Benefit Items screen, select the Add Ded & Ben button on the desired employee's row. This displays a list of available deductions that can be assigned to the employee.
Example: In Fig. 06 below, we see the Advance deduction in the list of available deductions to be added.
- Select the Advance deduction option from the list. This initial deduction now appears in bold font and can be used for ongoing deductions that will remain constant from pay to pay. However, since we are applying our deduction on a one-time basis, we will instead use a Temporary deduction that will clear itself after the pay run is closed.
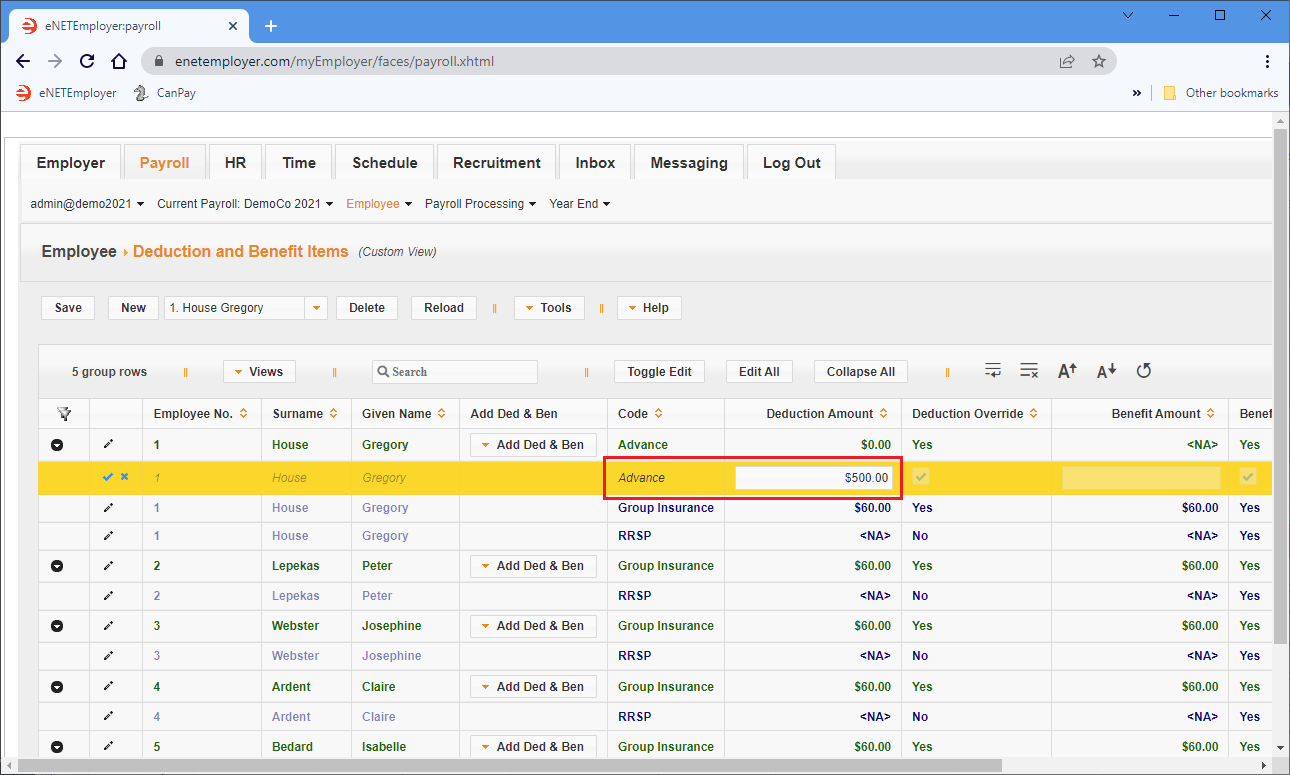
- Select the Add Ded & Ben button, and choose the Advance deduction option once again. This time, the deduction appears in a non-bold, italic font to indicate that it is a "temporary" item.
- Move to the Amount cell for the temporary deduction, and enter the desired amount (in our example we will enter $500.00 to match the original wage advance).
Example: In Fig. 07 below, we have added the $500.00 Advance temporary deduction to the employee.
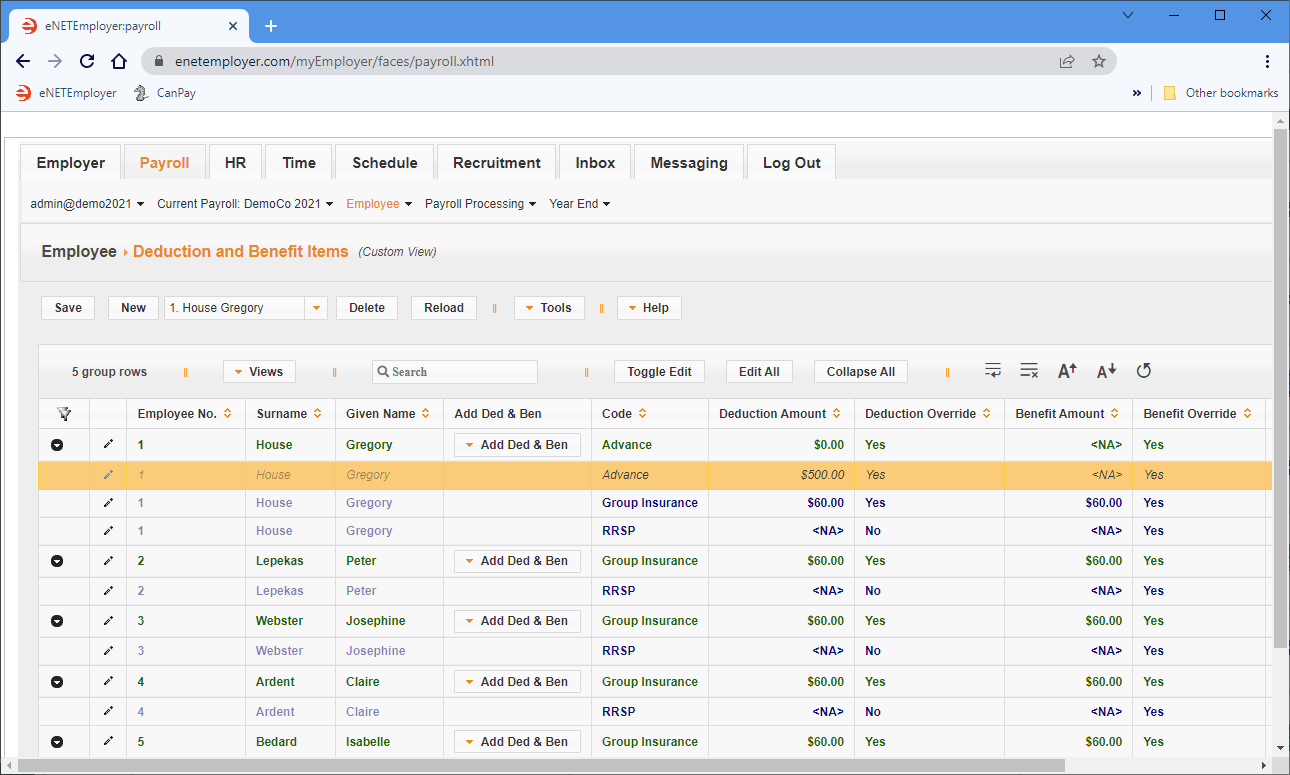
- Save the changes to the row.
Example: In Fig. 08 below, we see the Temporary deduction that will be cleared once the payroll is closed.
Now you can can calculate the payroll and review the advance deduction.
Step 6: Calculating the Advance Deduction
- Open the Payroll Calculations - Calculations screen, then choose the Calculate button.
- Once the payroll is calculated, choose the Generate Report button to create an interim Pay Register report.
- When the report appears on the screen, locate the appropriate employee's section, and you will see the advance deduction details.
Example: In Fig. 09 below, we see that the employee has $500.00 deducted from their wages for the period.
- Once you have reviewed that the deduction has been made, you can backup and close the pay period as you would normally.
Special Pay Runs and Mid-Month Advances - The previous tutorial showed you how to perform a wage advance using a Normal pay period. However, if you need to run a mid-month advance (or any other special run outside of your normal run), you would create an Additional pay run for this purpose. The Additional pay type allows you to pay specific employees (i.e. anyone whose Status is set to "Special"), thus excluding all other employees from the special run.
See Also
