Help Toolbar (select a button to browse other online help sections) Home Tutorials Resources Search Tabs & Menus Button Bar Table & Data Display |
Creating a Self-Service User Account for an Employee
Self-Service Account Overview - If you wish to learn more about employee self-service user accounts, refer to the Employee Self Service Accounts Overview before proceeding with this tutorial.
eNETEmployer allows administrators to create employee self-service user accounts for all employees who exist in a payroll. Accounts can be created one at a time, or for all employees at the same time.
The following tutorial to learn how to create these accounts for one employee only, and how to set various user options. Click Here to learn how to create self-service user accounts for multiple employees.
Note: Self-Service users accounts can only be created for an employee if they have a valid email address.
Managing User Logins - Companies who manage their own payroll are responsible for working with employees who need assistance with their individual self-service user accounts. Since each employee will receive an automated greeting when their account is created, we recommend that you notify your staff of this forthcoming email before you create their user accounts. You may even include links to the employee-related tutorials so that they are prepared for their first login. |
NOTE: Click on an image below to view it at full size.
To Create a Self-Service User Account for an Employee
Note: Employee self-service user accounts can be created from three different program screens; both the Employer tab's Admin - Users screen and the HR tab's Setup Employee screens allow you to create these accounts for all of your employees at once. This tutorial will focus on creating a self-service account from the Payroll tab's Employee - Setup Employees screen.
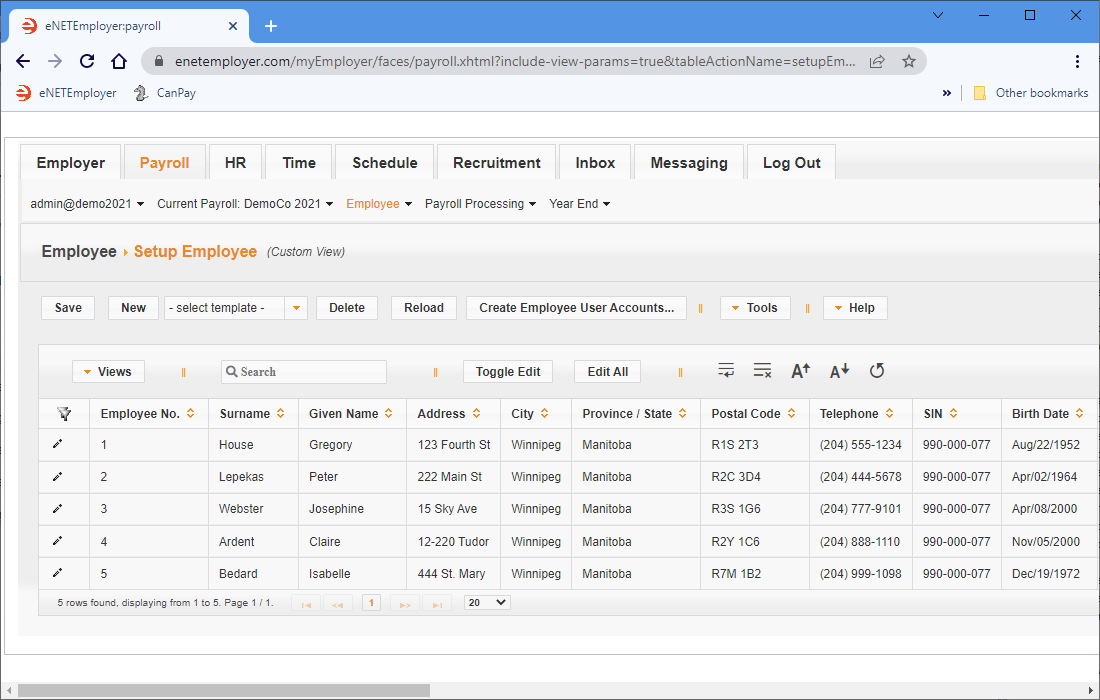
- From the Payroll tab, open the Employee - Setup Employee screen where you can add new employees, edit their detailed detailed information, and create their self-service user accounts.
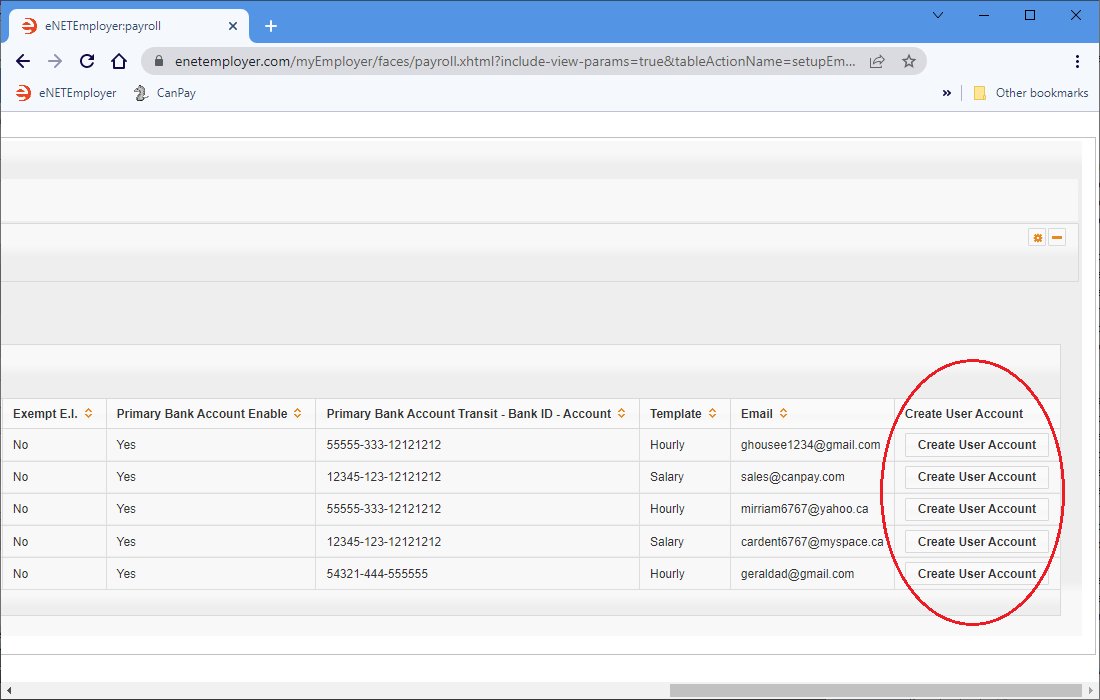
- Scroll the table to the right until you see the Create User Account column. Each row contains a Create User Account button that allows you to generate a self-service user account for the given employee.
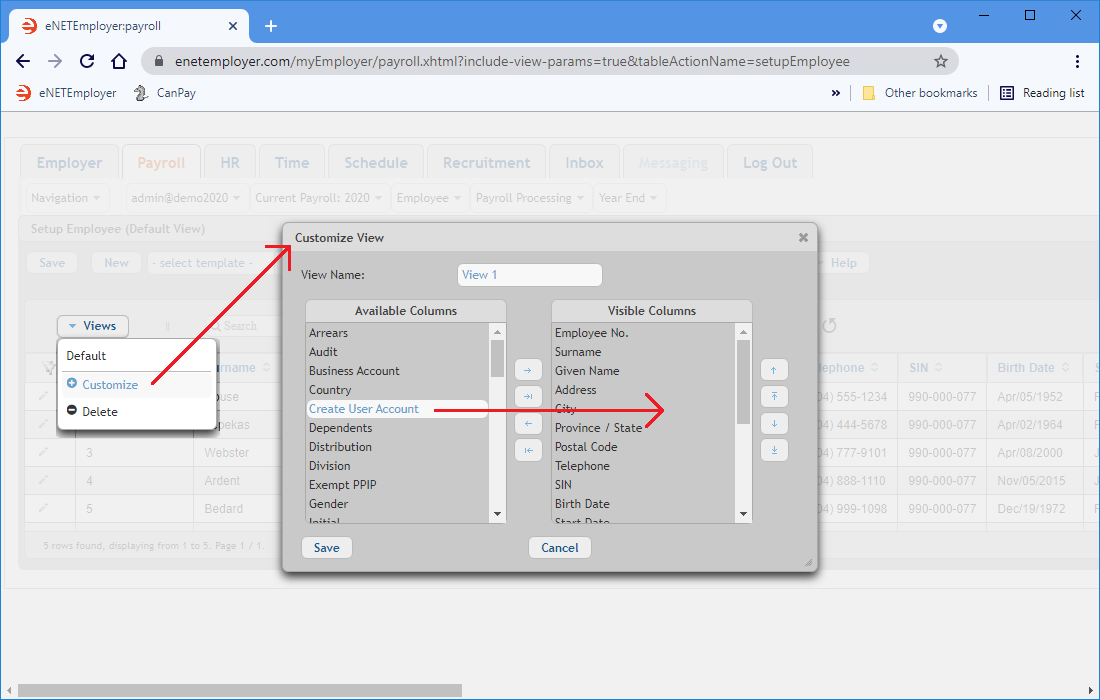
- Choose the Views button from the top left of the table. This display a pop-up window that shows you the columns that are currently displayed in the table on your screen, as well as the columns that can be added to the view.
- Click and drag the Create User Account item from the Available Columns section (on the left) over to the Visible Columns section (see Fig. 03 below).
- Enter a name for your custom view and then choose the Save button. The new column will now appear in the table.
Fig. 03: Moving the Create User Account column to the Available Columns section.
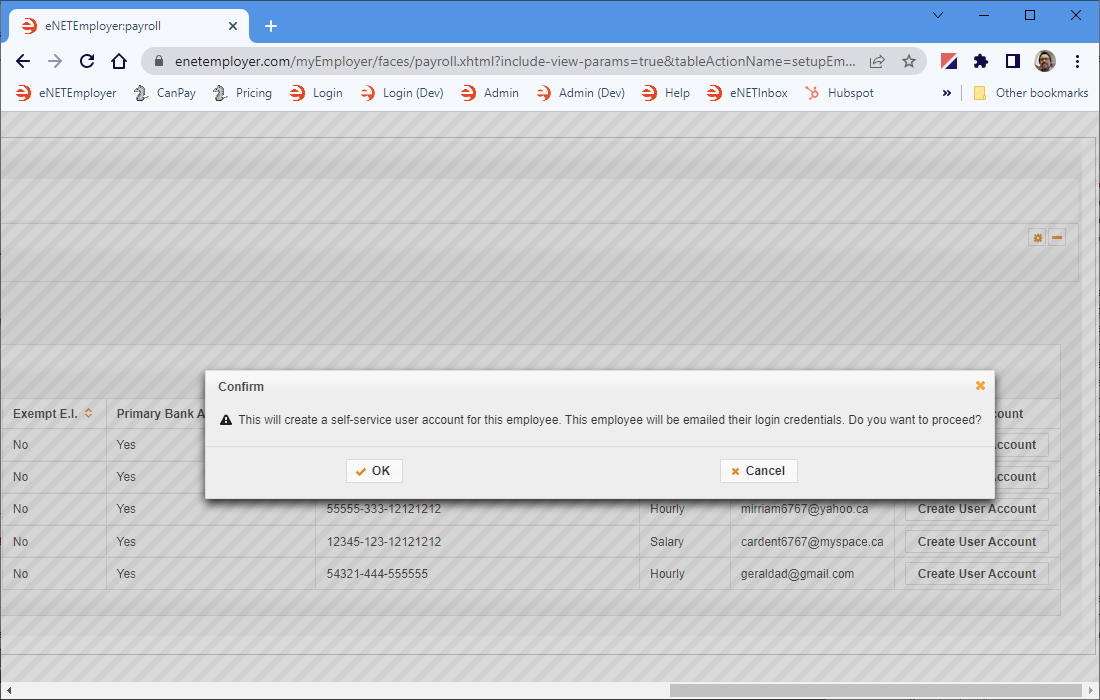
- Select the Create User Account button for the employee whose user account you wish to create. This displays a pop-up message asking if you are sure that you want to create the account. It also states that login credentials will be sent to the to the employee's email address.
- If you are sure that you want to create the account, choose the OK button to proceed The account is created and the employee is immediately sent an email that contains their unique username and login credentials. Notice that the Create User Account button becomes unavailable to indicate that this action has already been taken.
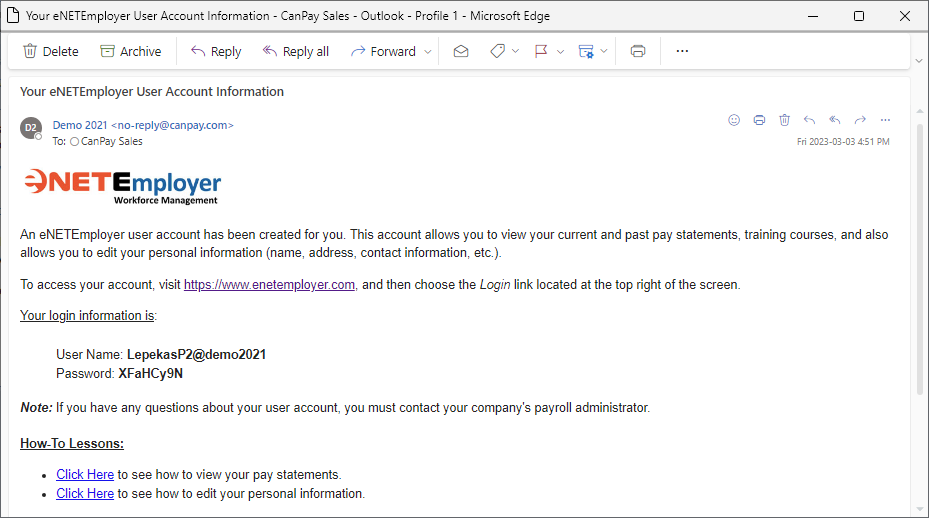
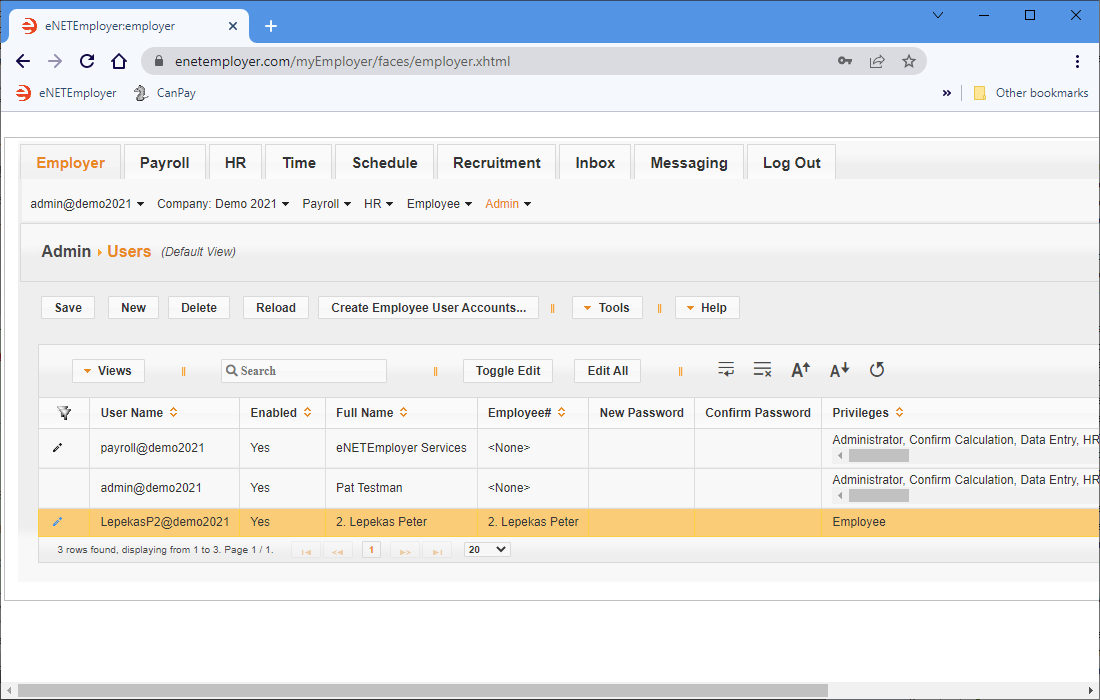
Example: In Fig. 05 below, our sample employee receives an email that contains his eNETEmployer login credentials. Upon first login, the employee will be prompted to reset his password. - From the Employer tab, open the Admin - Users screen where you can see the employee self-service accounts that have been created for your employees. Employee self-service accounts are designated as "Employee" under the Privileges column.
Example: In Fig. 06 below, we have highlighted the self-service account for our sample employee. - Reset the password for user accounts.
- Enable or disable user accounts.
- Add or delete user accounts.
- Change the privileges for a user account.
- Force users to change their account password.
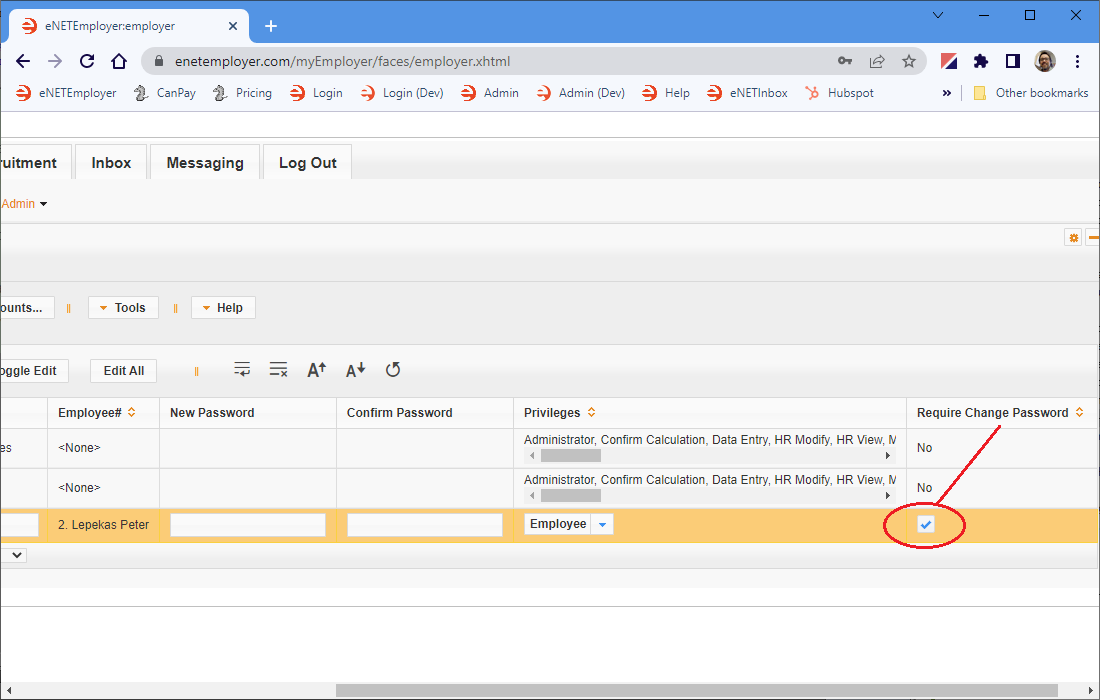
- Double-click on the employee's row to activate Edit Mode, move to the Require Change Password column, and then place a check in the box.
Example: In Fig. 07 below, We have activated the Require Change Password feature for each of our employee's user account. - Once your changes are complete, choose the Save button (or the Pencil icon at the left side of the row) to save your changes.
The next time the employee logs into eNETEmployer, he will be required to replace his original temporary password with one of his own choosing.
Adding the Create User Account Button - If you cannot see the Create User Account button on your screen, you must add this column by using the Customize Views feature: |
Now we will view the user account that has been created for the employee.
This screen displays each of the users associated with your payroll account, and also allows you to perform the following actions:
We will continue with this tutorial and force our sample employee to change his password the next time that he logs into the program.
This completes the tutorial on creating employee a self-service user account for one employee.
Creating Self-Service Accounts for a Multiple Employees - If you wish to learn how to create employee self-service user accounts for all of your employees at once, refer to the Creating Self-Service Accounts for Multiple Employees tutorial. |
See Also
For Employers:
- Creating a self-service user account for an Employee
- Creating self-service user accounts for multiple employees
- Resetting account passwords
- Modifying account access
- Approving year-end forms
For Employees:
- Viewing your pay statement
- Viewing your T4
- Viewing your T4A
- Viewing your RL1
- Editing your Personal Information
