Help Toolbar (select a button to browse other online help sections) Home Tutorials Resources Search Tabs & Menus Button Bar Table & Data Display |
Customized Views
For this tutorial, we will use the Customized Views feature to both hide and show a column. Customized Views is a powerful feature that allows you to organize and save a user-defined set of columns and viewing preferences for any program screen. Once these custom preferences have been saved, they are known collectively as a "View".
Customizing the column view to meet your company's specific requirements is very useful in that it removes redundant data columns and presents you with only those pertain to your payroll structure.
This tutorial includes instructions for two typical customizations:
- Part 1: Remove a Column From View
- Part 2: Adding a Column to Your View
- Part 3: Saving Sorted Columns in a Custom View
NOTE: Click on the images below to view them at full size
Part 1 - Remove a Column From View
Note: The following instructions apply to ALL program screens: The following tutorial discusses how to customize the view for the Employee Address screen - but you can use these instructions for any and all eNETEmployer screens. |
- From the Payroll tab, choose the Employee - Employee Address menu option (as mentioned above, you can choose any screen you wish to customize).
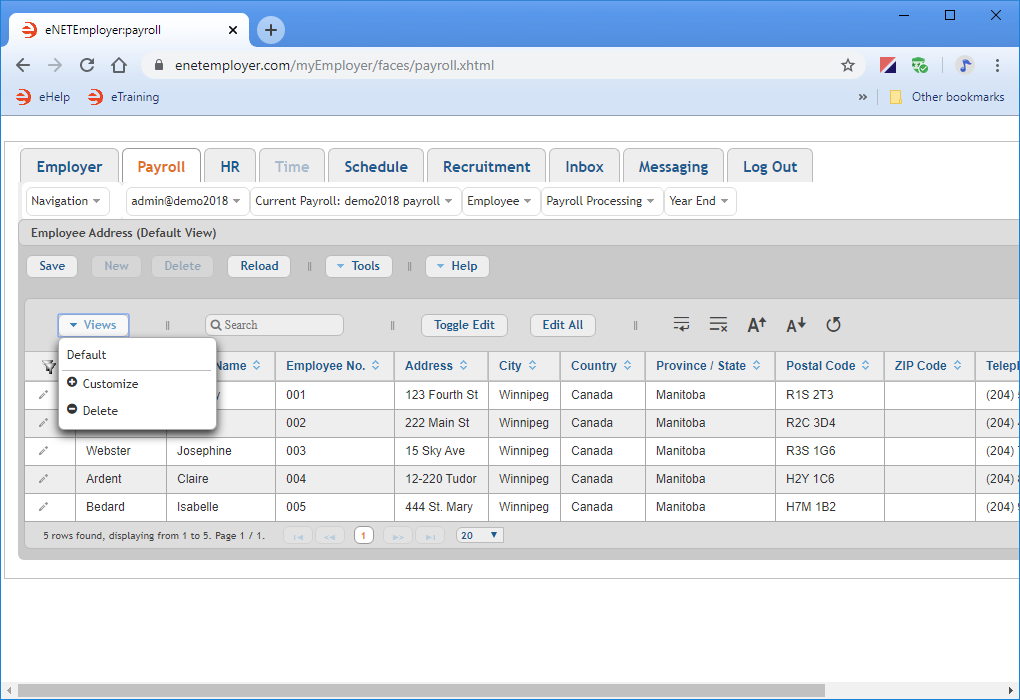
- With our sample Employee Address screen open for viewing, we will select the Views button that is located at the top left of the table. This displays a drop-down menu with options that control the columns that you see in the table.
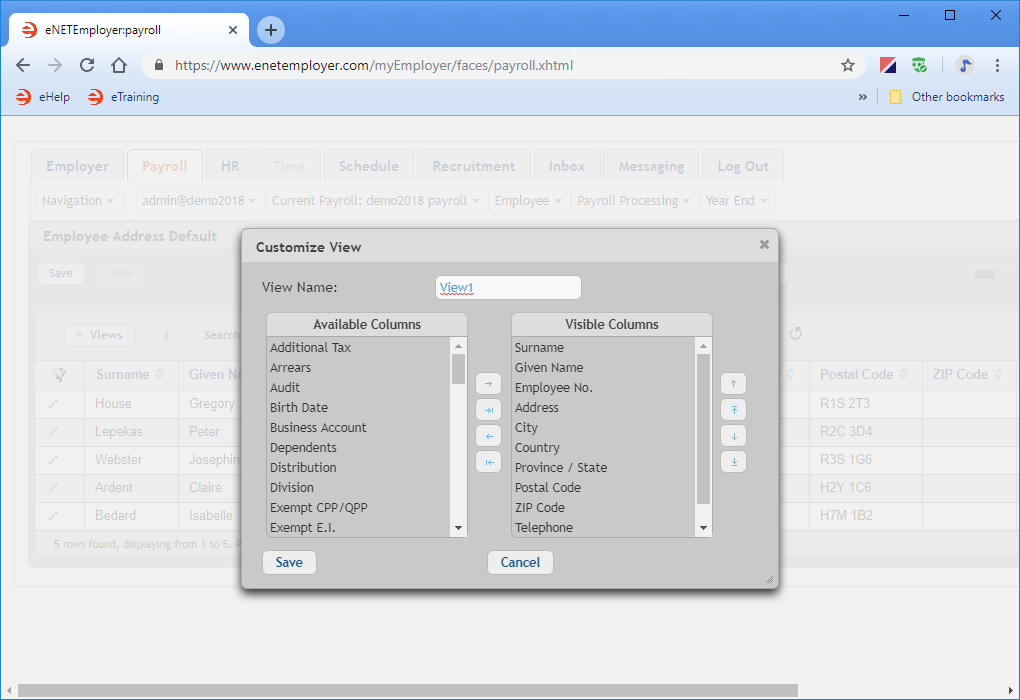
- Choose the Customize option from the drop-down menu. This displays the Customize View window.
The Visible Columns section on the right section of the window shows the set of data columns that are currently visible in the table. The column on the left shows many other data columns that you can choose to display in your table simply by moving its corresponding label over to the right section of the window. Columns can be moved in a number of ways:a) Clicking on a column name and dragging it to the opposing section or into a new location in the same section.
b) Double-clicking on a column name (which will move it to the opposing section).
c) Using the Arrow icons located in the center of the window to move an item(s) from one section to another. - Click on the name of the column that you wish to hide, and then move it to the Available Columns section using one of the three methods above. Note: If you mistakenly move all of the columns and cannot recall the previous order, you can undo the move by choosing the Cancel button to close the window, and then re-opening the window once again.
- Repeat the preceding step to hide additional columns as needed.
When you have finished hiding your columns, you must assign a name to your new column layout. This name will be added to the View button's drop-down menu and will be available along with the original Default view. - To add a name for the new column layout, move to the View Name field at the top of the window and replace the suggested default name with something that better describes your custom view.
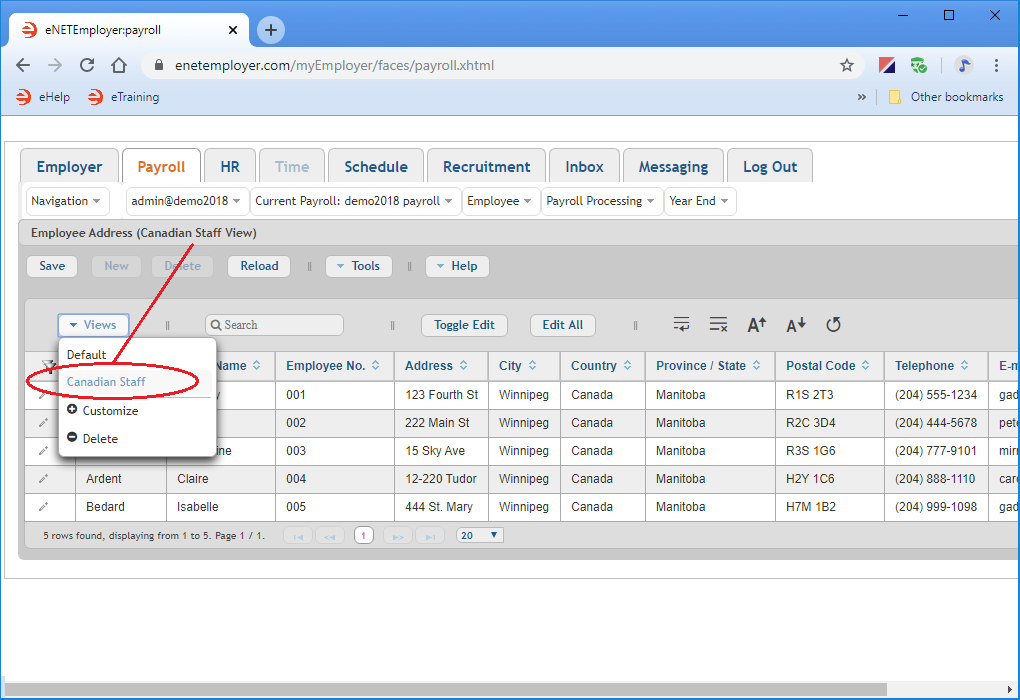
- Once the name is complete, choose the Save button at the bottom of the window to store your changed view. The screen is refreshed and the table now excludes the columns that you have hidden. The label for the screen is also changed to reflect the custom name that you entered.
Example: In Fig. 03 below, we have hidden the Zip Code column from view (since none of our employee reside in the United States). Then we entered "Canadian Staff" as the name and saved the custom view.
We will now continue the tutorial by adding a column to our view.
Part 2 - Add a Column to Your View
- With the Employee Address screen open for viewing, select the Views button and then choose the Customize option fom the drop-down menu. This displays the Customize View window.
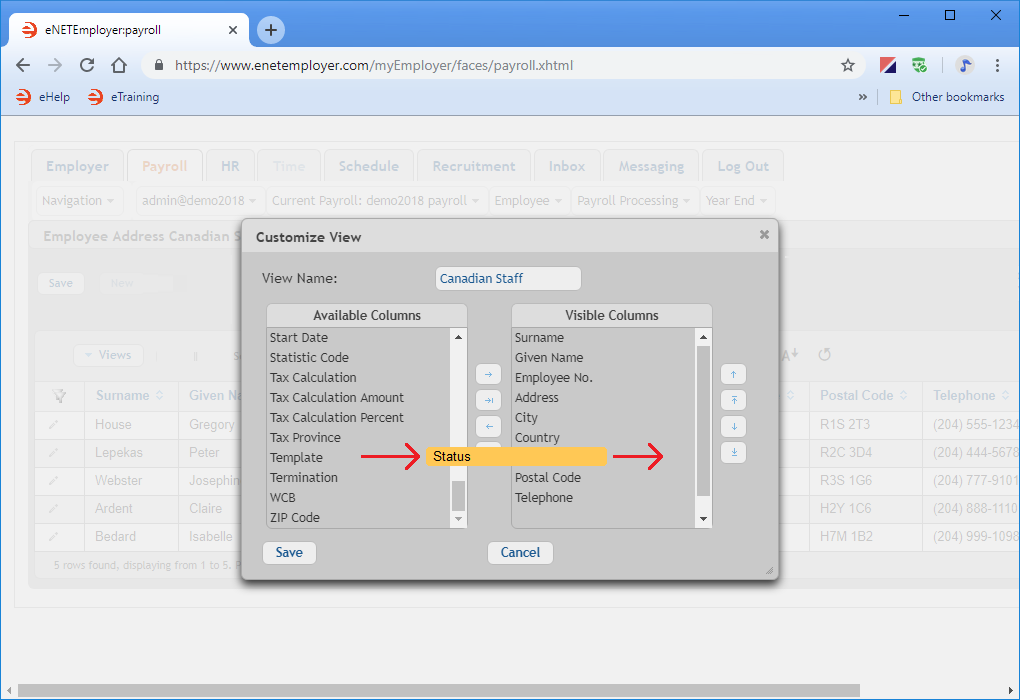
- Click on the name of the column that you wish to add, and then move it to the Visible Columns section.
- Repeat this procedure to show additional columns as needed. When you have finished adding your columns, assign a name to your new column layout and then choose the Save button. This will close the Customize View window and update the page display with your additional columns.
Example: In Fig. 04 below, we add the Status column to this page view by dragging it to the Visible Columns section.We will now continue the tutorial by discussing how to sort your column data and to save the resulting sort method as a custom view.
As discussed earlier, the Available Columns section on the left section of the window shows the set of data columns that can be added to the table simply by moving its corresponding label over to the right section of the window.
Part 3 - Saving Sorted Columns in a Custom View
If you have arranged your column data using the Sort or Filter icons at the top of each column, these settings will be stored in the custom view when it is saved. This is an efficient way to display your data exactly as needed anytime you revisit a screen.
- Click on the label for the column by which you want to sort your data (the label is located at the top of each column). This sorts the rows alphabetically by the chosen column. It also adds a number "1" beside the column label to indicate that this column is now designated as the Primary sort order (because you can click on subsequent columns to further sort your data if you wish).
- To sort the rows in reverse alphabetical order, click on the column name once again.
- Once your rows are sorted as needed, select the Customize option from the Views button at the top left of the table. This displays the Customize View window.
- Assign a name to your new column layout and then choose the Save button. This will close the Customize View window and your custom sort order will now be displayed each time you visit this screen.
This completes the Customized Views tutorial.
See Also:


